Showing posts with label pencil drawing. Show all posts

Saturday, April 4, 2015

Sketching Several Photos into One Piece of Art: the Farmer and the Horse.


  My house has been busy with several projects lately, and I thought I'd stop by to share one of them today.

   I was asked to do a piece for a lady that would be done in pencil.  Her husband has told their children stories about a farmer and his work horse and she wanted for me to create an image to remind them of those story times with him.  She wanted the man to be indistinguishable, as we all know how we form pictures in our heads when we hear stories, and she wanted each child to be able to keep their own ideas of what he looks like.

We looked up some images on Pinterest to try to get a working idea together, and I began to use these as basics of what to work toward.  (I will suggest if you like horses, type in 'work horse' or 'draft horse' on Pinterest...there are AMAZING pictures of them!)  I found several photos ideas for the farmer and the horse.

  I started by measuring out and drawing a box in the size that was wanted for the image to be.  This gave me guidelines of how large to make the sketches.


I spent a considerable amount of time sketching the images onto tracing paper.
(There were more eraser crumbs on that page than is probably legitimate for one piece of artwork!)
Often, I would stop and take a picture and then walk away, come back, and look at the picture in the camera.  Something about doing that makes me get a clearer perspective on it.
I could see in the image above that my horse's nose was off from what a work horse's nose should be.


In this sketch, I could see the horse's eye not right, and the man was a bit disproportionate as well.


I finally got a sketch I thought I could work with,
rubbed charchoal on the back lightly,
and then traced over the front drawing lines so the image would go onto my good paper.


I then began first with the eye of the horse.

When that was where and how I wanted it, I added some detail around it.


I did not mind that my horse was not exact. I wanted to take some artistic license as to the coloring and the angle that the horse would be approaching the farmer because I was using a few different photos to create the image I was trying to achieve.  The photos were just used as guides.


Here is a picture that shows you the light sketch that was transferred of the whole image.


I continued adding more details to the horse.


At this point, I realized I did not like what I was seeing in the nostril/chin/lower muzzle shape of the piece, so I set it aside to pick up for another day.

I will do the same now and will show the pictures/progress of that part in my next post.


Thank you for stopping by!


Thursday, March 13, 2014

Art Lesson: How to Draw a Bee on a Flower


Hello!
Are you thinking about spring today?

We had a taste of spring, and then it blew away returning the bitter cold to remind me that spring is still a week away.


I decided to draw a bee on a flower to help welcome spring.


First I started with the basic shapes of the parts of the picture.


I then added more of the basic parts of the bee.


Finally, I started sketching in more detail of the bee
as well as the individual petals.

All those tiny petals can seem daunting...


but in order to make a flower look realistic, especially this close up,
each petal must be considered.

Really, once they are started, it doesn't take as long as one might think
and the result they give makes them worth it.

(I watched  African Queen while I added the details of the petals and the finishing of the bee;
funny how looking at the bee now reminds me of Humphrey Bogart saying, "Rosey, old girl.")


I continued to add shading and detail until I felt it was enough.


I photocopied the original and then outlined it to show what it would look like in ink.


Here is the step by step sketch sheet if you would like a print up.


The print up sheet is free for personal use, just not for resale.
Thank you for stopping in.
(To copy these pages, click on the image, right click, and then click on "copy".

Open up Microsoft Word and right click on the screen, and then click "paste".
 The image should paste onto the page.

You can then click "print".
If you have difficulties or suggestions, please let me know.)


Sharing at:
Tipjunkie.com 
Homestoriesatoz.com 
Notjustahousewife.net 
Savvysouthernstyle.net 
Abowlfulloflemons.net
Betweennapsontheporch.net


Saturday, March 8, 2014

Art Lesson: Drawing a Tractor.


This post is a bit later than I wanted to get it on here because,
well,...
I'm going to be honest:
I kept pushing off getting this sketch done.


I wanted to do a sketch/painting on a piece for my husband's birthday,
and he's a tractor sort of guy.

Farmall's are his favorite,
but he actually has a John Deere right now,
so what was I to do?

Here is how to do a simple sketch of a Farmall.


After I had done that sketch, I decided to try this picture that I have of my husband with our son.


With this sketch, I just began by taking visual measurements and adjusting as I went along.
The Farmall was easier for a beginnier tractor, I thought, and I was glad I started with that one.


This was a sketch that pushed me outside my comfort zone, 
and I think a big part of the reason is that I do not know tractors...
their structure: how they are made, where their parts are,
their "skeletal shape," in a sense.

I know my husband (who does mechanic work) knows the parts and shapes of the features,
so I felt like every detail had to be more precise,
like copying the alphabet of a language that uses different lettering...
each line and curve must be very specific.


I am still finishing this piece;
I hope to watercolor it tomorrow and share the result when it is finished.


Because I still feel unsure of tractor art, 
I plan to take a picture of it when I am done outlining it with the pen,
and try painting a copy for practice first.

Stretching my brain to draw something I was uncomfortable with was great brain exercise,
and I am sure I could use more of that!

Have you had to do any forced pieces of art lately that made you paint outside your comfort zone?

Thanks for stopping by!


Thursday, November 14, 2013

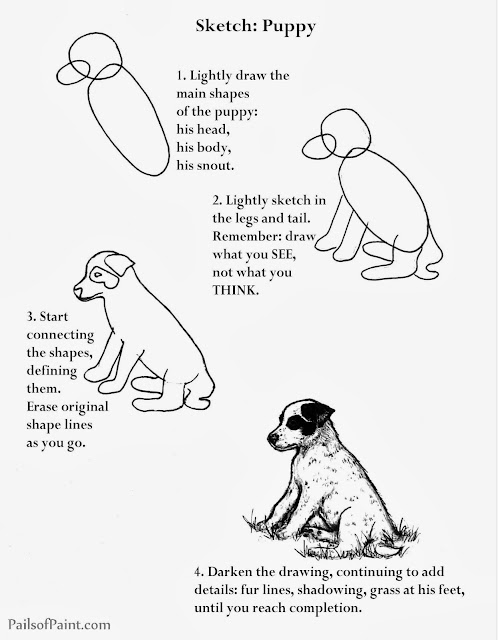
Art Lesson: Sketch Page of Puppy.


This week, I am sharing a page from my sketch book
showing how to draw this sitting puppy.


Here is the page from my sketch book.


Here is a page you may print up for your children or yourself,
if you would like to try sketching the pup.
(It is free for use, just not for resale).


Thanks for stopping by!


(To copy these pages, click on the image, right click, and then click on "copy".

Open up Microsoft Word and right click on the screen, and then click "paste".
 The image should paste onto the page.

You can then click "print".
If you have difficulties or suggestions, please let me know.)


Wednesday, October 23, 2013

Art Lesson: Rooster.


This week's art lesson is a sketch page of our rooster.


I like our rooster.
He is quite the protector of his three lady hens and I enjoy watching him find bugs and then
cluck to let them know he has something for them.

He has been pretty tame to us humans so far,
and I hope that will continue so that all will be peaceful around the yard.


Here is a printable sketch page which you are free to use as you'd like,
just not for resale.


Thank you for stopping by!


(To copy this sketch page, click on the image, right click, and then click on "copy".

Open up Microsoft Word and right click on the screen, and then click "paste".
 The image should paste onto the page.

You can then click "print."

If you have difficulties or suggestions, please let me know.)


Wednesday, October 16, 2013

Art Lesson: Sketch Page of the Hemlock Tree.


For today's art lesson,
I sat out on the porch and sketched the hemlock tree on the far side of our small orchard.


Here is the view of the sketchbook.


 My tree trunk is a bit more swayed than the tree is,
but it was a fun tree to draw.


 Here is a sketch page to print if you would like.
It is free for use, just not for resale.


There is so much variety to trees.
Have you drawn or painted any trees lately?

Thanks for stopping by.


(To copy then sketch page, click on the image, right click, and then click on "copy".

Open up Microsoft Word and right click on the screen, and then click "paste".
 The image should paste onto the page.

You can then click "print" to print the sketch page.
If you have difficulties or suggestions, please let me know.)


Tuesday, October 15, 2013

The Artist: Mary Engelbreit


 (This is a book about Mary Englebreit full of her wonderful illustrations and her encouraging story and words.)

"I taught myself by copying, but if you do that long enough, you start drawing your own little people, which for me happened when I was just about eight." - Mary Engelbreit

Mary's success in her art is shown by her over 6,000 pieces of artwork.


Mary Engelbreit is a favorite artist of mine.  
(Yes, I suppose I have several favorite artists, but I have admired Ms. Engelbreit's work for most of my life).

I just so enjoy her bright colors and unique style. 
The creative way that she frames her artwork in patterns and designs punctuates the fun and draws the eye in.

I love that Mary never went to art school.
She is a picture of success by keeping to her own style of art and by her hard work.

Mary graduated from high school and went on to work at an art store where she met and was encouraged by the working artists that came in.
She then worked at an ad store where she garnered even more knowledge.

(To see her selection of books, click >HERE<).


Her style of creating art is this:
Mary does her entire piece of artwork on one page: she doesn't sketch her pieces out first.
She starts the artwork in pencil.
Mary then uses micro pen to ink it in.
Next she uses markers to color it: Prismacolor, Copic, or Tria.
She finishes the piece with Prismacolor colored pencils.
Each of Mary's artwork pieces take anywhere from 40 to 100 hours.

(source: Pinterst from the live interview with Mary Engelbreit).
Mary does not sit down to draw everyday at a scheduled time.
She says that creativity hits at times and she jots that idea down so it doesn't get lost,
sometimes even on the back of a napkin.
Mary says her favorite place to work is in her home studio,
late at night when it is quiet
(I love that.  I can relate!)

Ms. Englebreit has created many inspiring quotes. Some of my favorites are:

“One loses many laughs by not laughing at oneself. ”

 “Walk towards the sunshine, and the shadows will fall behind you.”

"Happiness must be grown in one's own garden. ”

"If your ship hasn't come in, swim out to it.”

 ----Mary Engelbreit (from Goodreads.com)


To see some of Mary's fun artwork, click >HERE<


To see Mary's live interview offering helpful tips on what she's learned about marketing artwork, click >HERE<.

Other great interviews that were used for the info on this blog post are these: >www.maryengelbreit.com<
>www.harpercollins.com<


Thanks for stopping by!


Wednesday, August 28, 2013

Art Lesson: Writing Neatly on Artwork.


Hello.


Today I am going to be picking up my pencil
and giving a tip on how I go about creating wording in artwork.


I took some pictures of two enjoyable elements in my life:
canning jars and flowers.   I thought this would be a fun picture to attempt for a fair exhibit.

I want to experiment with some watercolor paints since it has been quite a while since I have used them, so I thought the blue glass would be bright and bold.


I decided to narrow the focus of the picture, but I always seem to have trouble with wording.
Writing neatly, especially on artwork seems to be a frustration for me.

I start the sketch on tracing paper to work out the details.
I knew I would be making many mistakes and a lot of erasing.


One trick that really helps me is to get the shape/position of the lettering drawn in first,
usually in the shape of a rectangle.


I then sketch in the first letter, and usually the middle letter and last.
This isn't always the exact middle letter.  It depends on the size of the letters.  "I's"  take up much less space than "M's" or "W's".

Because of the angle of the jar in this picture, I started with the first letter and the last letter that looked full-sized.


I then worked and reworked the lettering until I got the letters to look as they did in the photo.


The borders of the rectangle help me to keep to the letter size, spacing, and angle I need them to go.

Have you tried doing lettering on artwork?
Do you have any tips to share?  I'd love to hear.

I will work some more on this picture and show you how it turns out soon.

Thanks for stopping by and take some time to enjoy the roses...
it's always worth it!


Tuesday, May 21, 2013

Art Lesson: On the Fence.


Hello!
Today I would like to share some thoughts on drawing wood.
My art lessons each week are not based on a certain process of conquering art skills,
but usually just consists of what I am learning along the way.

I have a project I am working on that includes a wooden sign,
so I thought I would take you through the process I went through.


 My idea started as a rough sketch.


with a few changes along the way.


When I got what I wanted, I outlined the picture with a copic liner and erased the pencil lines.


(Feel free to print up this image and make your own colored fence painting!
As always, my images are free for use, just not for resale).


While trying to decide what to do with the sign, I headed outside for a better idea of what wood looks like.


 I got some ideas from the old painted (non-functioning) outhouse we use for storing some tools.

I love the look of white-washed wood,
but I also got a few pictures of the natural color on the old grape arbor.


So many colors and lines in the old weathered boards.


While snapping pictures, our cat Moon came racing by chasing a creature.
I had to call my son and daughters when I saw what it was, hiding in the grass by my feet.


 He disappeared into the undergrowth under the lilac bush and we hoped he'd realize our yard with the cats and dogs wandering around isn't a safe cafeteria for rabbits.


I decided that the weathered wood was what I was going to attempt for my sign.


I began with some very light grays.


The darker grays were added...


and then I marked in some spots of greenish yellow.


Some warmer grays helped blend the colors.
 This was probably a good place to stop, but I didn't think it was detailed enough for what I wanted.
(I have a problem knowing when to stop when it comes to coloring).


 I added some even darker grays...


 as well as some extremely light blue.


 The colorless blender helped mellow the colors.


 A final coat of warm gray covered everything up, making a slight mossy look to the wood,
or, at least, that is what I was trying to get.


To add just a bit more age to the wood, I lightly drew in a few more suggestions of rough, cracking wood.


A final touch of colorless blender to make a few places lighter and accentuate the darker.


Wood is such a versatile and beautiful subject in artwork
even though it is such a simple thing.


The project is not finished yet, but I am hoping it will work for what it is intended.


If you have a chance to take a walk this week, notice the wood you encounter on your trip.
It seems to be all around, doesn't it?
Pick up a pencil or some colored pencils and see what you discover.
Remember, if you ever want to share what you've worked on, I would love for you to share it on my facebook page.


Thank you for stopping by!