Showing posts with label sketch book. Show all posts

Wednesday, October 23, 2013

Art Lesson: Rooster.


This week's art lesson is a sketch page of our rooster.


I like our rooster.
He is quite the protector of his three lady hens and I enjoy watching him find bugs and then
cluck to let them know he has something for them.

He has been pretty tame to us humans so far,
and I hope that will continue so that all will be peaceful around the yard.


Here is a printable sketch page which you are free to use as you'd like,
just not for resale.


Thank you for stopping by!


(To copy this sketch page, click on the image, right click, and then click on "copy".

Open up Microsoft Word and right click on the screen, and then click "paste".
 The image should paste onto the page.

You can then click "print."

If you have difficulties or suggestions, please let me know.)


Wednesday, October 16, 2013

Art Lesson: Sketch Page of the Hemlock Tree.


For today's art lesson,
I sat out on the porch and sketched the hemlock tree on the far side of our small orchard.


Here is the view of the sketchbook.


 My tree trunk is a bit more swayed than the tree is,
but it was a fun tree to draw.


 Here is a sketch page to print if you would like.
It is free for use, just not for resale.


There is so much variety to trees.
Have you drawn or painted any trees lately?

Thanks for stopping by.


(To copy then sketch page, click on the image, right click, and then click on "copy".

Open up Microsoft Word and right click on the screen, and then click "paste".
 The image should paste onto the page.

You can then click "print" to print the sketch page.
If you have difficulties or suggestions, please let me know.)


Friday, August 2, 2013

Art Lesson: Seeing and Drawing in Reverse.


My art lesson this week is very late, and I am sorry about that.
I have been determined to get the cushions covered on the chairs on the front porch before summer passes.


Here they are.


Here they were before.
As you can see, they were in desperate need of attention.


Here they are looking off the porch from the other direction.

I used three different  materials on them as I got the material at a discount store and there wasn't enough of one.


I thought the contrast of the three materials would give some variety.

I hope to cover a couple of throw pillows in the orange and dark purple for the couch as soon as the old pillows I washed to recover are done drying on the clothesline.


I put the screen I had painted sometime back out on the porch to block the trash can/recycling can.
I think I may put a hook and chain and attach them to the wooden ceiling so that they don't blow over when it gets windy.

It is nice to finally have the porch as a good place to sit.
The cat Moon thinks so, too.  I think he may be the new couch hog.


Now on to the lesson.


When doing art, it is easy to draw the basic outline of whatever it is we are attempting to draw,
and then color that in.


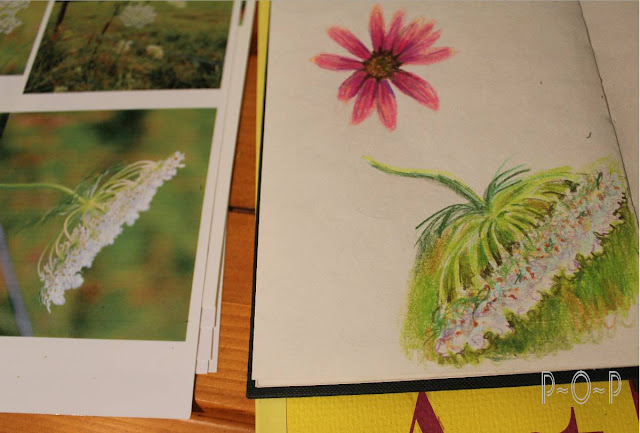
Take for example, this echinacea flower above.


Once we get the basic outline and color on the paper, we then proceed to shade and add the detail.


Sometimes, however, it is essential to look at whatever it is we are drawing from a backwards viewpoint, drawing the outside of the object without drawing the object,
usually because it is white.


 This stretches the brain
(or perhaps I should say, it uses a part of the brain that we do not use a lot).


  I always find myself feeling a bit disagreeable when I have to use this reverse thinking,
but I know it is very good at stretching one's art abilities and forcing the brain to draw what it sees rather than what it knows.


I recently had to do this and the image in my sketch book, above, was a practice sketch.


I wanted to do a piece of artwork of some Queen Anne's Lace.


It is such a simple beauty, but I knew it would be hard to capture it's detail.


I decided to do the piece using my Prismacolor colored pencils.

First I sketched what I wanted onto tracing paper.


Because this is a white flower, I did not want to use anything too heavy to transfer it onto my good paper, so I just rubbed the pencil I was using onto the back, it being a harder lead.


I then flipped it over onto my paper and lightly traced it on.


I then started a bit of shading.


I find when I am doing a white object,
the background is going to receive more attention to make the white stand out.
I got to a certain point of my shading and decided to start adding in the background to help me visualize the white space better.


 Because the background of these flowers is blotchy, I did not feel I needed to put in all the background base color at one time, but chose to work in sections.


The picture looked nice enough to me at this point


(I tend to be afraid to keep at something for fear I may mess it up if I overwork it,
most likely because I have ruined projects by not quitting when I should have).

I could have stopped here, I think,
but my daughter said she thought the original photo was just so beautiful,
 I decided to work with it a bit more.


I find when working with a detailed project like this that requires a lot of reverse thinking,
I have to stop after a time and put the piece aside.

A fresh start the following day always feels great and gives a renewed look to pick up colors and areas of new work that may have been missed in the previous sitting.


 I have worked on this piece for two evenings, and am hoping I can finish it on the next evening I sit down to it.


Do you find you have to put some art or painting projects down and come back with renewed focus?

Have you ever tried to draw or paint something white?
Be daring and take the challenge this week and stretch your abilities.
Give yourself time to work on it when you don't feel hurried or pressured as it is helpful to be relaxed when working on something that requires this kind of thinking,

Work a practice run in your sketch book first.
You'll be glad you did.


And, as always, thanks so much for stopping by to visit!


(For those of you who may be wondering, I haven't forgotten the unfinished duck painting.
I plan to finish it to enter in the fair.  I just set it aside because I had to do this project for a specific reason.)


Linking up to these fun blog parties:


Wednesday, May 15, 2013

Art Lesson: A Wooden Man, Proportions, and the Park.


Hello, friends.

Today's lesson is just a few tips and a sketch challenge.


Sometimes when I think up something I want to draw, I don't have a specific picture to draw from.
I tend to have problems unless I can get the basic structure drawn of my subject.


When it is a person I want to draw, this wooden man comes in handy.
(I think mine was found at a yard sale, but they can be picked up at craft stores as well.)

I do wish that they sold him in child form as well.
Children's proportions are much different than adults.
As babies, the head is roughly 1/4 of the body size.
As the child grows, the scale of the head to body diminishes until,
as an adult, the head is about 1/8 of the body size.


(Here is a rough sketch to illustrate what I am speaking of.)


Regardless, it is nice to have my wooden model man because his arms, legs, back, head all move pretty well the way a normal body would,
so the gesture or position one desires can be seen by moving him around.


 I had an idea for the sketch I wanted on this coloring page, but my man was not looking correct to me,
so I brought out the wooden model.


He helped me get my proportions better in line as well as the positioning of his body and a better length of his legs.


I could then be creative with the rest of his features.

If you find you would like to do more people sketches, you might want to pick up a wooden model for yourself.  


Since the lesson today was a simple one,
I will leave you today with a sketch I put into my sketch book since we last met.
I took my children to the park and figured it would be a nice time to sketch.
I decided I was going to try to draw something I felt was hard to challenge myself.


(I drew the picture from real life, but took a photo to show you.)

It is always a bit daunting to me to draw from real life, as well as attempting to draw something that doesn't exactly appeal to my desire to draw.

If you would like a challenge this week, take your sketch book outside and draw something that looks hard to you.  Give yourself a time limit (I had about an hour for this one, with a few interruptions for a tire swing push and to help somebody across the monkey bars). 

I was pleasantly surprised at how the playground equipment was not as difficult as I expected,
even though I can see obvious errors in my sketch.
However, that is what I view my sketching is good for:
practicing and challenging myself to attempt things that may later come into use to help me with something else,
and then it won't seem so overwhelming because what I thought was impossible has been done before.


Thanks for stopping in.
If you get a chance, pick up your sketch book this week and see what you can do.
You'll be glad you did!


Wednesday, April 17, 2013

Seeing the "Lines" that Make Art Come to Life.


There are lines all around us.

It is pretty amazing that just a few lines scratched onto paper can seem to tell a story.

What do you see in these simple stick figures:


Vertical lines (up and down) often give the feel of stability, strength, grandeur
like a forest of tall trees, skyscrapers, or a soldier standing at attention.


Horizontal lines give the feel of peacefulness and calm
like a sunset or a lake or a bed.

Diagonal lines can give the feel of movement, action, liveliness.

(Of course, this isn't always the case, but it seems to often be this way).


Here is some live examples of diagonal lines showing action.


I decided to sketch this one.


I find that starting with a stick figure can be helpful in getting the lines right.


Once I got the lines the way I wanted, I started adding form to the body as well as the clothing.


I then etched in some of the features of the face, noticing that only one eye is visible...


and even that is just a simple line of lashes.


The nose is two little dots at the end of a curved line
and the lips are a smudged line with a slight cheek curve at the edge.


Her dress has obvious shaded areas,
like a triangular shaped area that covers nearly the whole front of her dress.


Squinting and lightly rubbing my pencil on the areas of the skin that looked shaded helped to finish the sketch.


See if you notice the lines of things around you and if they give you certain feelings.
Then take up a pencil and draw something that catches your eye.

Thanks for stopping by!


This is part of my free art lesson series each week.
To see the full list of art lessons, click <HERE<.

(I now have a facebook page.  If you would like to share your own artwork you are working on, I would love to see it.  Please, just remember that my blog is also for children who want to use the art lessons (and I would LOVE if you want to help them share theirs as well), so please share artwork that is family friendly content.  Thanks so much.)


Sharing this post at:
Nominimalisthere.blogspot.com 
Adiamondinthestuff.com
Aboverubies.net
Time-warp-wife
Abowlfulloflemons
Newlifeonahomestead: Homestead-barn-hop 
Betweennapsontheporch
 Embracingchange.com
Theshabbycreekcottage.com 
Raisinghomemakers.com 
 Firefliesandjellybeans.com
Savvysouthernstyle 
Gnowfglins.com 
Bystephanielynn: Sunday-showcase-party


Wednesday, April 10, 2013

Sketch Book


This week's lesson is about having a sketch book,
a place to practice and journal your art endeavors.


Do you have a sketch book?

 (They are also called 'art journals'.)


A sketch book is a great tool for every artist.


For this blog, I purchased a sketch book.


It is a handy place to keep my thoughts all together.


 An art journal is helpful for drawing the things you see around:
a person, place, or just something you want to capture on paper.


It is a great place to practice drawing because it is just for fun,


just to practice.


When something doesn't turn out as expected...


 it can be a stepping stone for next time.


Instead of using pencil, one might chose to use a light color of the image
to sketch out the basic shape.


New attempts can be made,


sometimes right away,
sometimes a little while later.


Instead of drawing what one thinks should be there,


one must train the eye to pick out what is really there...


and draw what one sees.


If you can, get a sketch book to capture your practice,
adding dates and some words.

If you have a picture of something you were attempting to draw,
glue that to a page, if you'd like.


It is your book to use as you please:
your tool to be shaped to your hand.

Someday you'll be able to look back and see,
not only some great memories,
but terrific improvement as well.


 And it is an enjoyable way to get a few minutes of art into some spare moments you may find.


If you have a sketch book, do you have a favorite page?
If you don't have one, please try to make room in your plans for one very soon in your future.
 You'll be glad you did.


This is part of my free art lesson series each week.
To see the full list of art lessons, click <HERE<.

Sharing at:
Funkyjunkinteriors.net
Lifeingrace
Newlifeonahomestead: Homestead-barn-hop  
Betweennapsontheporch 
Iheartnaptime