Showing posts with label sketching. Show all posts

Wednesday, January 20, 2016

Art for the Kitchen: Woodburned Wooden Spoons


The kitchen holds so much of our lives:
cooking, eating, washing dishes, chatting and laughter, playing games, singing...

It makes sense to fill our kitchens with things that we love, don't you think?  Since I can't always find those quirky things I have a liking for, creating some becomes the only option.


Having a Russian father, I have a special place in my heart for Russian nesting dolls (matryoshka dolls), which aren't always easy to find, so I decided to wood-burn one on my spoon..


Making Borscht will be extra fun now, I think.


Here is the process I use to go about wood-burning wooden spoons.

First I sketch the design I've chosen lightly with pencil.  I then begin wood-burning as if I was using a pen.  (There is not way to erase with a pen, so that is why it is more like drawing with a pen rather than a pencil.  There is no room for error so having a steady hand is necessary.)


Being careful 
1. not to let the wood-burner sit too long on any spot: this makes a deep, dark burn;
2. not to accidentally touch anywhere on the spoon with the tool where marks are not wanted because it can make marks rather quickly.
These are two tips that I had to learn the hard way.


When the burning is finished and you are satisfied with your burning, turn the wood-burning tool off and set it aside in a place where it can safely cool; it stays hot for a bit of time (and be sure to stop when you like it as it is: better to stop when it is satisfying than to continue and possibly make an un-fixable mistake).

Once you have made sure the spoon is also cooled, erase the pencil markings from the spoon.


Next I use coconut oil and rub it into the spoons.  I also have some beeswax around, so I rub in a small bit of that, too.  You just want to rub in an oil that wouldn't be harmful to eat as some will come off when you use it in cooking.  I have found rubbing coconut oil into my wooden spoons every few months helps to keep them from cracking.


The backs of the spoons are also fun to burn but be sure to do them before you rub the oil onto the spoon's front.


I enjoyed doing these spoons more than I expected, so I bought a selection at a kitchen store and burned them to sell at the Christmas craft sales.  These were fun to work on in the evening when the kids were in bed and I was sure to have quiet (and no bumping).


I got some ideas from Pinterest, some from calendars or cards, some from things I have enjoyed drawing before.  The scope of ideas is endless!


I think these chickens were from a design I saw on a piece of material; I liked their quaint simplicity.


 I did not sell all of the spoons, so some were great to give away in Christmas gift bags.


 I had fun making these and I'm sure you might, too!


Thanks for stopping by!


Saturday, May 17, 2014

Using a Sketch to Bring a Painting to Life.


Hello again, friends!

It has been a long time.

My easel has looked like this for some time now.


I recently discovered an artist's picture that I thought was so creative and beautiful.  It is Slaveika Aladjova's lion print done in watercolors, brushed with bright colors and dripping paints.


I wanted so much to try this technique.

I dug out the bee sketch I did a few weeks back,...


printed up the image I had sketched (enlarging it to the size I wanted to use in my piece),
rubbed pencil lead on the back of it,...


turned it over and taped it where I wanted it to be on my piece, and then traced the image so that it transferred onto my canvas.


I lightly added some more flower details to the canvas, and then decided to use some permanent calligraphy ink to mark parts of it.


I did not mark every line that I had sketched with the pencil, just the ones I chose to be in the piece. 


Once I was finished with it, I took a picture of it and printed up several of the images onto some heavy cardstock paper in an attempt at doing some different techniques and colors like the colorful lion watercolor.


(I still hadn't erased the pencil marks in this picture).


I will end this post here now and continue with what I came up with in a future post.


Thanks for stopping by!  I do plan to come around more often as the plant sales have passed, and I am so happy to be back at the paintbrush once again.


Wednesday, March 26, 2014

Art Lesson - Sketch Page: Little Mouse


Hello!

I have been dieting the last month and a half,
a challenge between a couple of people and I,
It was a pretty focused endeavor.


My husband's boss and the secretary at his job are very thoughtful people
and often send home little treats to the kids or myself.

About a week or so ago, the secretary sent home a piece of cake for me:
she told my husband to have me wait until the kids were in bed,
and enjoy the cake all by myself.
Of course, she didn't know of my diet competition:
it was a sweet and kind gesture.

The cake was the most incredible-looking chocolate cake I have ever seen:
rich, dark frosting covered in mini chocolate chips,
drizzled with a bit of butterscotch.

The kids were all as desirous of it as I was.

Of course, I did what any good dieting mother would do:
I put it into a container and buried it in the freezer where it would be safe and sound until the competition was over, and I could enjoy it then.

The competition ended the day before yesterday,
and I waited a whole day before I dug the cake from the freezer.

I am being very good about it and only ate a section of it,
gave a few small bites to the kids,
and have the rest saved for another day...
after the incredible taste of it,
I am thinking that will be tomorrow.
:)


All that to say, I purposed to make a nice card for the thoughtful secretary
for such an incredibly delicious cake.


I decided to add a bit of something cute to the card,
so I decided on a little mouse to be in the picture.

A great tool for digging up realistic pictures of creatures is,
of course, the internet.


I typed in "cute  mouse" in the search engine,
and these are some of the images that popped up:


Using a combination of the images,
I came up with a sketch page to get myself familiar with this creature.


 I then sketched a picture of a mouse with some cake,
and then copied my sketch (using the light box) onto another page.

I am glad that I did because I used watercolors and did not like the way a few parts of the picture came out, so I used my original and the light box again, and am coloring it in this time with copic markers and colored pencils.


I haven't finished it yet, but here is the image of the mouse in watercolors.


I wish I could share a bit of the cake with you...
INCREDIBLE!


Feel free to print up the mouse page and give him a try,
if you'd like.  He is free for personal use, just not for resale.


Thanks for stopping in!


(To copy these pages, click on the image, right click, and then click on "copy".

Open up Microsoft Word and right click on the screen, and then click "paste".
 The image should paste onto the page.

You can then click "print".
If you have difficulties or suggestions, please let me know.)


Saturday, March 8, 2014

Art Lesson: Drawing a Tractor.


This post is a bit later than I wanted to get it on here because,
well,...
I'm going to be honest:
I kept pushing off getting this sketch done.


I wanted to do a sketch/painting on a piece for my husband's birthday,
and he's a tractor sort of guy.

Farmall's are his favorite,
but he actually has a John Deere right now,
so what was I to do?

Here is how to do a simple sketch of a Farmall.


After I had done that sketch, I decided to try this picture that I have of my husband with our son.


With this sketch, I just began by taking visual measurements and adjusting as I went along.
The Farmall was easier for a beginnier tractor, I thought, and I was glad I started with that one.


This was a sketch that pushed me outside my comfort zone, 
and I think a big part of the reason is that I do not know tractors...
their structure: how they are made, where their parts are,
their "skeletal shape," in a sense.

I know my husband (who does mechanic work) knows the parts and shapes of the features,
so I felt like every detail had to be more precise,
like copying the alphabet of a language that uses different lettering...
each line and curve must be very specific.


I am still finishing this piece;
I hope to watercolor it tomorrow and share the result when it is finished.


Because I still feel unsure of tractor art, 
I plan to take a picture of it when I am done outlining it with the pen,
and try painting a copy for practice first.

Stretching my brain to draw something I was uncomfortable with was great brain exercise,
and I am sure I could use more of that!

Have you had to do any forced pieces of art lately that made you paint outside your comfort zone?

Thanks for stopping by!


Thursday, January 30, 2014

Art Lesson: Sketch Page of a Cardinal.


Hello!

Today I am sharing a sketch page on cardinals.

I had a request to paint some of these,
so I drew one first, to get their proper body shape.

Here it is:


Adding paint makes them stand out more.

Who doesn't love the bright red of the cardinal against a fresh snowfall.


Of course, cardinals are beautiful any time of the year!


Until next time, keep sketching;
and thanks for stopping by.


As always, these sketch pages are free for use, just not for resale.

(To copy these pages, click on the image, right click, and then click on "copy".

Open up Microsoft Word and right click on the screen, and then click "paste".
 The image should paste onto the page.

You can then click "print".
If you have difficulties or suggestions, please let me know.)

Thursday, November 14, 2013

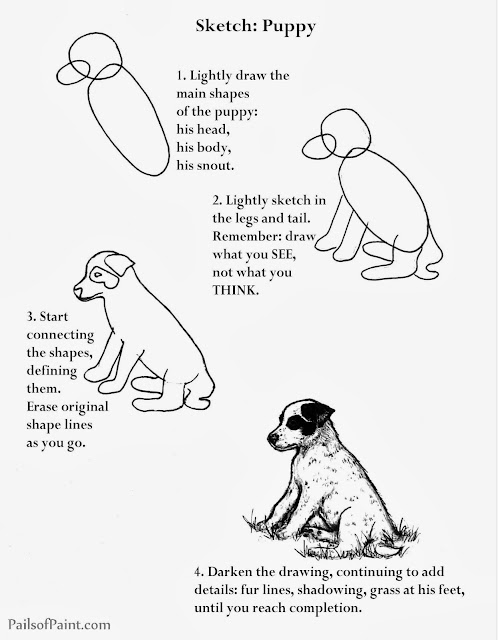
Art Lesson: Sketch Page of Puppy.


This week, I am sharing a page from my sketch book
showing how to draw this sitting puppy.


Here is the page from my sketch book.


Here is a page you may print up for your children or yourself,
if you would like to try sketching the pup.
(It is free for use, just not for resale).


Thanks for stopping by!


(To copy these pages, click on the image, right click, and then click on "copy".

Open up Microsoft Word and right click on the screen, and then click "paste".
 The image should paste onto the page.

You can then click "print".
If you have difficulties or suggestions, please let me know.)