Sunday, March 30, 2014

When Colored Paint Helps Hide the Damage.


Hello!


  Sometimes I find it difficult to know whether to paint a piece of furniture or leave it as wood.  I love a mixture of the two around the house.  Take for example, this round table that my mother gave me.  I treasure this table and the beautiful carving all around the edges of the table top.


I needed to do something with it because the top was badly scratched and had bubbled and peeled varnish which made me feel like it looked messy all of the time.  I hid it with doilies for a long while but finally decided that I either needed to paint it or strip it.


Because of the detail of the carved wood and the fact that my life is filled with kids and so many other projects right now, I decided to give in and just paint it.


I used Annie Sloan Chalk paint which is a favorite of mine because it eliminates the need to sand or prime furniture.  I gave it a fun two-toned look:
white for most of it and then Florence blue on the top.  (I will admit that although part of the reason I painted it a different color on top was for fun, but also because the white made it look too obviously marred to me: the color seemed to hide the seriously marred top a little better.)

(I painted the frame with some Annie Sloane paint a previous day, but am not sure the color.
Annie Sloan paint seems to be useful on just about anything).

Of course, I love bold colors in my living room anyhow, so that was obviously a good part of the decision as well.


I sanded the whole thing after the paint dried to make it look distressed,
and then rubbed some Fiddes and Sons Rugger Brown and clear wax on it.


Painting it made me feel better about it's rough look and added color.
Of course, it is always whatever makes your house feel like your own home that works for each of us.

For me all too often, I have to admit, I opt for the easier route of paint.

 
Well, it is snowing here again...
I do hope spring comes soon as I am ready to head into the flower gardens.
We found a great couch for the basement this weekend off of Craig's List and it will be fun to show you that room all finished soon.
 
Thanks for stopping by!


Sharing at:

Friday, March 28, 2014

Free Vintage Prints: Medieval Scenes.


Happy weekend!

I have not posted many vintage illustrations lately.
I am sorry about that.

I finally took some pictures from my late 1800's books
and decided I ought to get some on here.


My daughter has been studying the medieval times in history this year,
so these images stood out to me because of that,
I am sure.

However, don't we all find the age of knights and castles intriguing?


Here is the cleaned up image in black and white.


 Here it is antiqued.


This image of the girl out for a ride with the castle in the background was the only colored one in the book.


 I dulled the colors down a bit for this image:


 and here is the image antiqued.


If you would like to use these images,
they should, as far as I know, be free from copyright since they are from very old books.


To print them up in Word, click on the image, right click,
and then click on "copy",

open up Microsoft Word and right click on the screen,

and then click "paste",

it should paste the image onto the page.


If you have difficulties or suggestions,
please let me know.

Sharing at:
Betweennapsontheporch.net
Theprairiehomestead.com

Wednesday, March 26, 2014

Art Lesson - Sketch Page: Little Mouse


Hello!

I have been dieting the last month and a half,
a challenge between a couple of people and I,
It was a pretty focused endeavor.


My husband's boss and the secretary at his job are very thoughtful people
and often send home little treats to the kids or myself.

About a week or so ago, the secretary sent home a piece of cake for me:
she told my husband to have me wait until the kids were in bed,
and enjoy the cake all by myself.
Of course, she didn't know of my diet competition:
it was a sweet and kind gesture.

The cake was the most incredible-looking chocolate cake I have ever seen:
rich, dark frosting covered in mini chocolate chips,
drizzled with a bit of butterscotch.

The kids were all as desirous of it as I was.

Of course, I did what any good dieting mother would do:
I put it into a container and buried it in the freezer where it would be safe and sound until the competition was over, and I could enjoy it then.

The competition ended the day before yesterday,
and I waited a whole day before I dug the cake from the freezer.

I am being very good about it and only ate a section of it,
gave a few small bites to the kids,
and have the rest saved for another day...
after the incredible taste of it,
I am thinking that will be tomorrow.
:)


All that to say, I purposed to make a nice card for the thoughtful secretary
for such an incredibly delicious cake.


I decided to add a bit of something cute to the card,
so I decided on a little mouse to be in the picture.

A great tool for digging up realistic pictures of creatures is,
of course, the internet.


I typed in "cute  mouse" in the search engine,
and these are some of the images that popped up:


Using a combination of the images,
I came up with a sketch page to get myself familiar with this creature.


 I then sketched a picture of a mouse with some cake,
and then copied my sketch (using the light box) onto another page.

I am glad that I did because I used watercolors and did not like the way a few parts of the picture came out, so I used my original and the light box again, and am coloring it in this time with copic markers and colored pencils.


I haven't finished it yet, but here is the image of the mouse in watercolors.


I wish I could share a bit of the cake with you...
INCREDIBLE!


Feel free to print up the mouse page and give him a try,
if you'd like.  He is free for personal use, just not for resale.


Thanks for stopping in!


(To copy these pages, click on the image, right click, and then click on "copy".

Open up Microsoft Word and right click on the screen, and then click "paste".
 The image should paste onto the page.

You can then click "print".
If you have difficulties or suggestions, please let me know.)


Wednesday, March 19, 2014

Art Lesson: Watercoloring the Tractor Sketch.


Hello, friends.

A couple weeks back, we went through the process of sketching up some tractors.


This was the picture I was sketching from.


Today I wanted to share the process of using watercolors to paint the dried, inked image.


First, I used a mustard yellow wash to fill in the ground


and a lighter yellow on the tire hubs and the tractor.


I then added a green wash to the tractor and to the farmer's shirt and cap.


Next I made a very light gray wash using red, blue, and green and began painting the tire...


and loosely painted a background of trees.


I could see that there is three layers to this field:
the forefront layer that has a grassy look,
a cut layer of grass,
and a distant uncut stand of grass.


I made a green wash to paint the uncut distant grass.


I finished shading the tires, the exhaust pipe, some touches of black on the tractor,
and the piece of farm machinery being pulled by the tractor.


Next I decided to create the grassy front part of the field by loosely painting streaks of green,
some darker than others.


To created a faint look of cut grass for the layer of field behind the tractor,
I painted a wash of green and then painted swatches of a reddish green lines
and then dabbed them up somewhat with a tissue.


I create a division of the cut grass with the still standing grass in the background by painting a line of darker greenish red with strokes going up loosely, like grass would grow.


To darken the background trees, I first made a reddish black,
almost a purple, and did a wash of that over a section
and then went over it with sections of green.


Once this was complete, I changed to a very light blue wash and started the sky at the top and worked down toward the tree line.


I made a skin color with orange, yellow, and white and used a wash of this on parts of the farmer's face and arm as well as the child's face and legs as they stood out in the picture.
At this point, I also used blue on the farmer's pants and child's clothes with this same selective area painting.


Using some dull gray left-over from the tree background in the paint tray,
I put some shading in the yellow tire hub.
I also touched a few areas on the tractor with a reddish green to lightly shade areas as needed.


At this point, I sat back and looked at the painting.


 Something about it was not right to me.


I felt like the child's head was too small for his body.


I had a choice to leave it or try to fix it.

Perhaps I should learn to leave some things as they are,
but I couldn't let this one go.


I mixed some white, heavy on the brush and enlarged the head where I could see there was a white patch in the picture.  I added some blue, some brown for the hair, and a curl of dull white for the ear.


 I decided at this point it was good as it was and that I had better stop painting.


I painted this for my husband for his birthday as a checkbook cover.
(A plastic, clear cover that I found through a craft catalog years ago,
something similar to the one at the end of this post.)


Although this isn't perfect, I am enjoying learning to work with watercolors.
It is a rewarding working with a paint that you enjoy.
 I am glad the painting turned out in a way I feel happy with on a gift for my husband...
he deserves it. :)


Thanks for stopping by!


(I have added a few advertisements to the side of the blog for those who want to know the products that I use or think are useful... just trying to be helpful.  Of course, if you purchase anything from the links, I will be paid a little something, which is always helpful in funding my home and art supplies,  a helpful gesture! :)
(If these ads are annoying to you as you read, please let me know, and I will see if I can put them on their own separate page of the blog. ) 
 

Linking to these parties: Jenniferrizzo.com,
 

Monday, March 17, 2014

Simple Tricks to making a Room Better.


Every winter when we are all stuck inside, projects seem to pop up in the house.

 
I have hated our basement for a few years now.  It is the first room one generally walks into when arriving at our house, and it has needed renewed attention for some time.

This winter, I noticed a trend going on with the kids:
run into the house, dump the coats, boots, hats, and gloves all across the floor on the way to the wood stove.


I wished for a closet to help coral these things and give them a proper place to disappear to since the over-sized rubber maids I had for them couldn't seem to keep them very well.

I asked my husband to use his talents and build something for me.


He found some doors from somewhere where they were no longer needed, and then purchased some cedar boards off of Craig's List. (He figured the cedar might help prevent the spiders and millipedes from hiding in there so much, since basements seem to be their favorite place to be.)


This little closet has been the best addition for the basement.
(Thank you, Farmer!)
We now have a place for all the shoes/boots/and coats (can't you tell by the boots lying NEXT to the closet? Well, most of the time they make it into the closet; the youngest of us still needs some help remembering sometimes).

I painted a sealer over the outside of the cedar boards and then painted them with paint.


Another thing I did to renew the basement was a new coat of paint on the walls and woodwork.
My daughter and I picked a bold green called Lime Green to color the woodwork,
changed the cream walls to a brighter linen white,
and chose a brown paint that would be great at hiding some of the dirt for the floor.


I also painted up this piece of furniture to hold all of the videos and other supplies that seem to spread around the basement.
(This has been so much better than the open cubby storage unit you can see in the first picture.
Videos sitting around are such an eyesore and tend to grow into teetering towers.)


I had painted the floor when we first moved in ten years ago:
cream flooring in a basement entrance on a farm.
Let's just say it wasn't my brightest idea when it comes to a painting project,
(and this picture is right after I scrubbed it on my hands and knees, changing the bucket several times.)

This dirty floor has been a matter of constant irksomeness right from the start
(I painted the walkway and on into the laundry room with a brick pattern a few years later to try to make the floor bearable.  Athough time-consuming, it did really help, but the rest of the floor just never looked good).

If I had known how easy this method of adding paint chips to a painted floor was going to be,
I would have done it long ago, and I wouldn't have bothered with the 'brick' floor in the laundry room either.
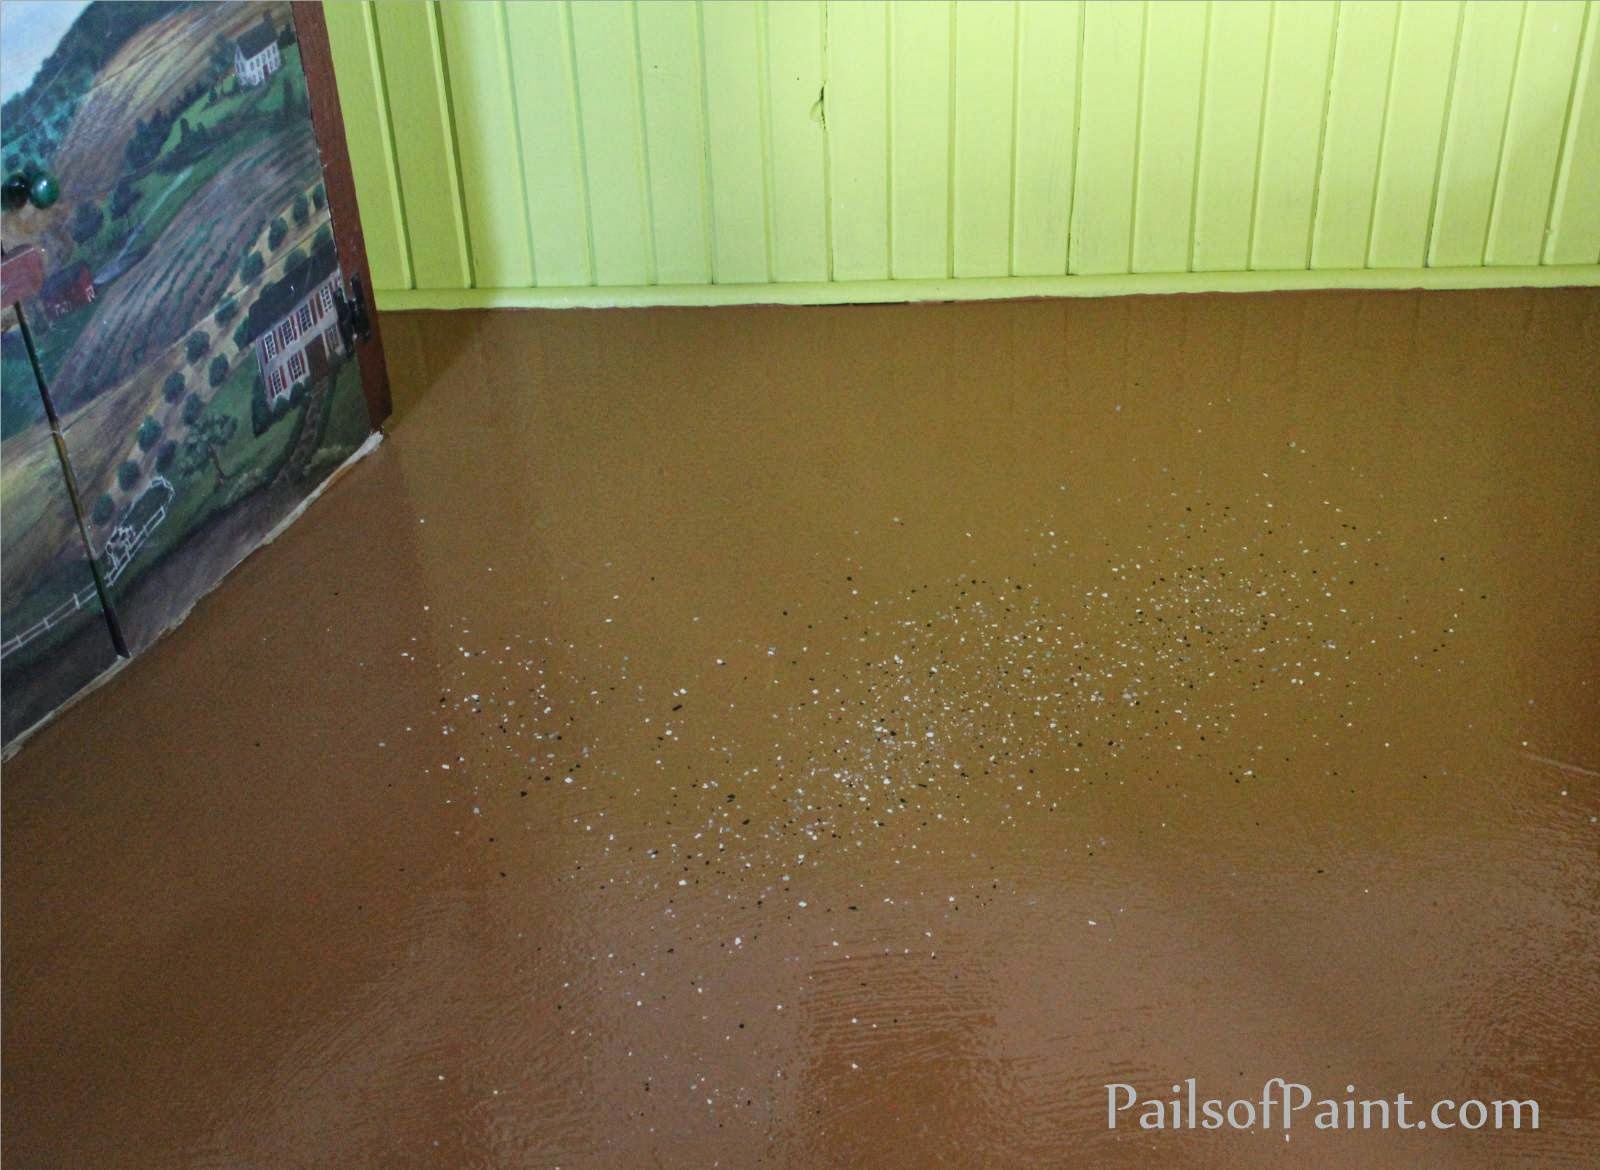
I purchased a good quality cement flooring paint from the hardware store as well as some paint chip sprinkles.


After I painted a 6' x 4' section
(large enough to still reach by tossing the sprinkles, but small enough that the paint was still very wet),
I stood and tossed the paint chip sprinkles into the air.


They fell in random placement.
I kept adding more thrown sprinkles until I got the coverage I wanted.

The flooring looks so much better; I only have half of it done at this point, and can't wait until it is finished.


One other small change to the basement was a simple painting of the woodwork around the windows.

I find that I prefer that woodwork to be the same color as the walls.  This creates a more open look, no division of wall and window.

(Because we have the deep window sills that are more like a shelf, sometimes I also do the sill the color of the walls; but sometimes I like the sill the color of the rest of the trim and woodwork.)

Painting the frame around the window was something I did to all the windows when we first moved here as well, and have slowly changed them over.


Here is the window with the colored wood frame in the green that it was;
(the sill has already been changed to the lime green color).


Here is the difference.


I was thinking about making some curtains but then opted for some simple lace ones I found at a good sale.


Another update to the basement walls is a wall of family photos.
I had a habit of buying frames for a while from yard sales and charity stores and decided to put them to use and make this place (where the kids tend to watch videos) a wall of memories.


The closet got a coat of the lime green paint, and I painted the door a bright, cheerful red.  The floor already looks so much cleaner, the speckles helping to hide the bits of dirt that come in on the previous battle field of  "can't EVER keep that floor clean."


I still need to put a second coat on one of the walls,  finish the other half of the floor, finish framing a few more pictures, a couch redo or replacement, and a couple more touches before the basement is complete, but it is looking so much better already.

I can't wait to be able to post the final results in the coming weeks: I'm determined to have it done before April.


It's always amazing to see the wonders a bit of well-applied paint can do, and learning what one likes over the years can help to turn a cluttered-feel house into a better home.


Thanks for stopping by to hear about my work in progress.


Thursday, March 13, 2014

Art Lesson: How to Draw a Bee on a Flower


Hello!
Are you thinking about spring today?

We had a taste of spring, and then it blew away returning the bitter cold to remind me that spring is still a week away.


I decided to draw a bee on a flower to help welcome spring.


First I started with the basic shapes of the parts of the picture.


I then added more of the basic parts of the bee.


Finally, I started sketching in more detail of the bee
as well as the individual petals.

All those tiny petals can seem daunting...


but in order to make a flower look realistic, especially this close up,
each petal must be considered.

Really, once they are started, it doesn't take as long as one might think
and the result they give makes them worth it.

(I watched  African Queen while I added the details of the petals and the finishing of the bee;
funny how looking at the bee now reminds me of Humphrey Bogart saying, "Rosey, old girl.")


I continued to add shading and detail until I felt it was enough.


I photocopied the original and then outlined it to show what it would look like in ink.


Here is the step by step sketch sheet if you would like a print up.


The print up sheet is free for personal use, just not for resale.
Thank you for stopping in.
(To copy these pages, click on the image, right click, and then click on "copy".

Open up Microsoft Word and right click on the screen, and then click "paste".
 The image should paste onto the page.

You can then click "print".
If you have difficulties or suggestions, please let me know.)


Sharing at:
Tipjunkie.com 
Homestoriesatoz.com 
Notjustahousewife.net 
Savvysouthernstyle.net 
Abowlfulloflemons.net
Betweennapsontheporch.net