Showing posts with label living room. Show all posts

Friday, October 9, 2015

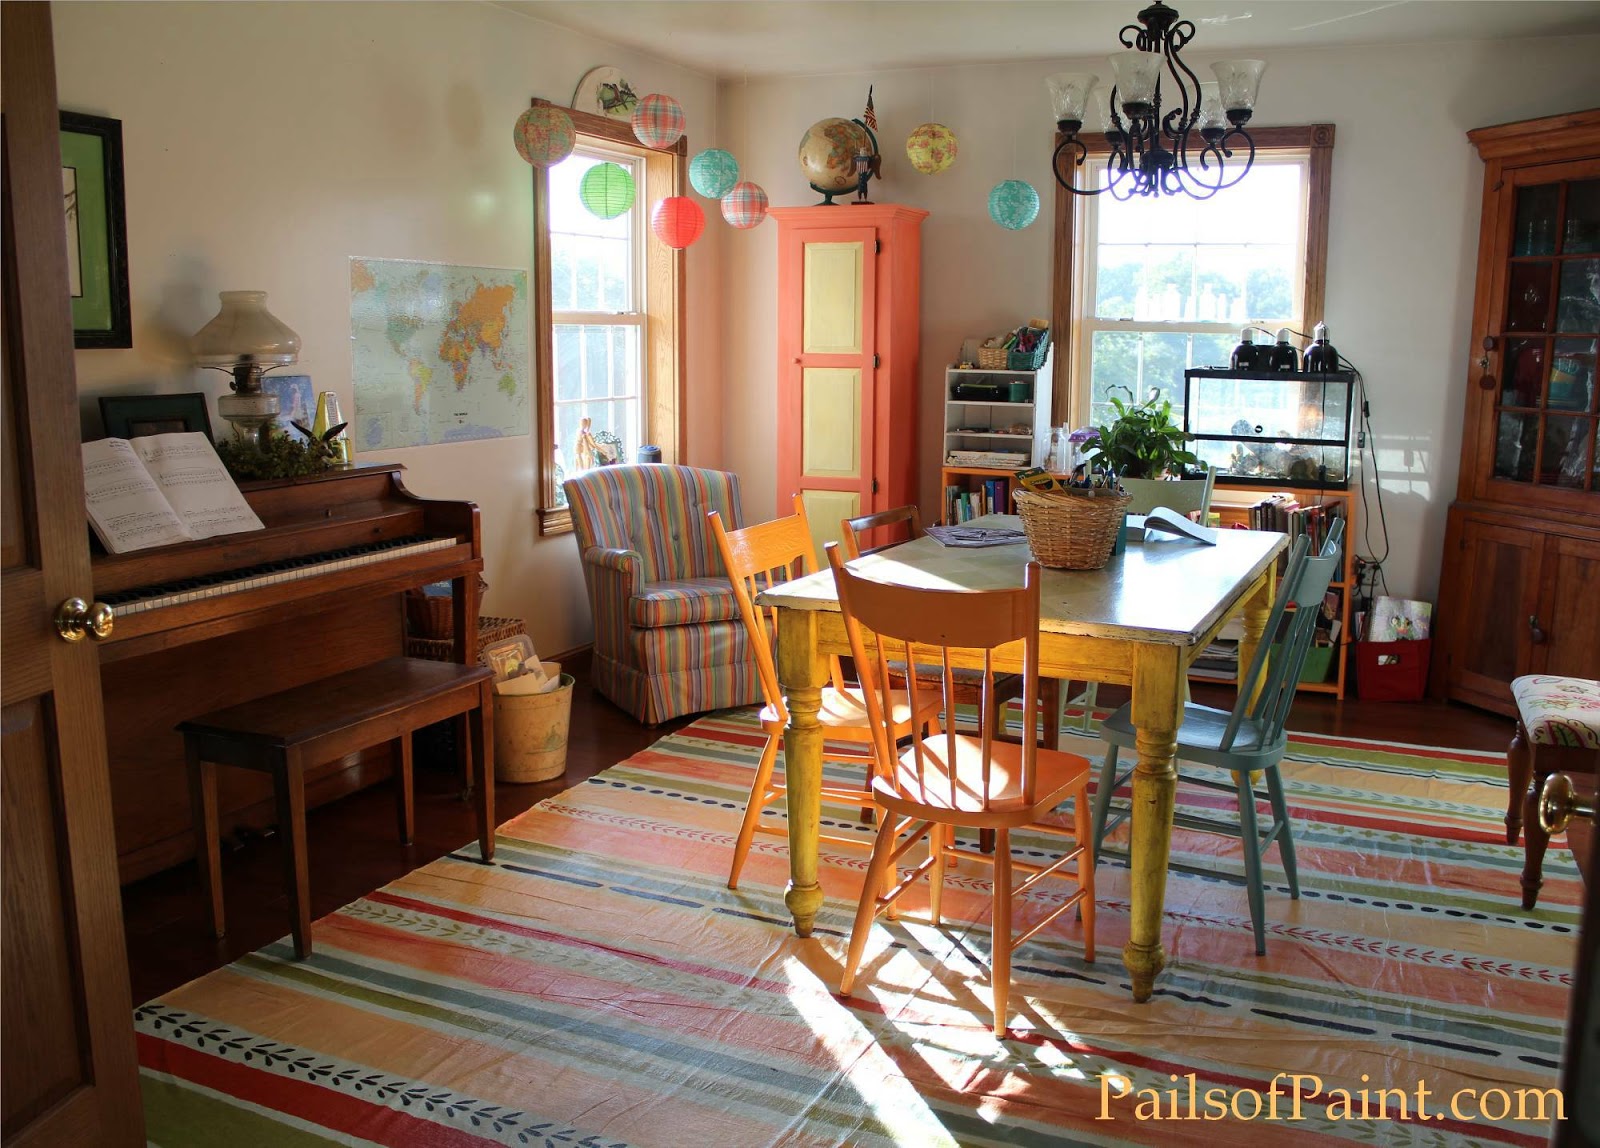
The Painted School Rug

We moved this summer...
the cows, the chickens, the ducks, the dog and cats, the bearded dragon,
and the people.

Of course, with moving comes new rooms with new needs.

The school room has beautiful new wood flooring
and my kids are students of various ages and mess-making ranges,
and I knew paints and play dough was still in our future.
The price of large rugs was a bit too much for my budgeting,
besides the fact that rug isn't always the best choice for paint or play dough either,
so I read up about painted cloth rugs and decided it was worth a try.


I bought a  9 x 12 Heavy Duty Canvas Drop Cloth  at the hardware store for about $27.
I laid it out on the living room floor since there was enough room there to work.
I put plastic liners underneath (I think I had an old shower liner, cheap party table cloth, whatever I could find to fit the purpose).

(Tip: if I were to do this again, I would iron it and sew the edging under to give it a finished look before laying it out to paint it.  I made the mistake of thinking the wetness of the paint would draw out the wrinkles, but it did not completely; I also thought I would be able to do the edging after the rug was complete, but also not an easy task once the layers of paint have added their bulk).

I then painted a base coat of flat interior wall paint: whatever I had left from the old house.  (This is a great way to get rid of old paint you don't want to store any more.)
The color was a dull greenish gray by the time I had mixed all the left-over colors together.
I think it would have been even thicker if I had done another coat,
 but I used up all the paint I had and didn't feel like buying more, 
so, once the base coat was dry,
I moved on to painting a coat of off white semi-gloss interior wall paint as the base color of the rug
(I don't think it matters whether it is semi-gloss: it is just what I had already).
The off white paint was allowed to dry.


The fun part of painting the colors on the rug came next.

I looked at rugs I liked on blogs, pinterest, magazines, and finally decided on a variety of stripes and designs.

I was in a hurry to get the rug done, so I just painted the stripes on without any guides,
also using house paints that I wanted to use up.
When my daughter kept telling me she really wanted to help,
I pulled out the frog tape and laid out a few guides so she could paint some stripes. 
This was a school rug so perfection was lower on the grade than creativity.


She did a great job, it helped speed the process up with both of us at work,
and we both feel good about the rug we made.


Once the rug was colorful from end to end and dried completely,
we dragged it out on the porch since it was a sunny day
(we brought the protective plastic for the edges).

I then painted water-based polyurethane in a nice thick coat over the rug.

It dried quickly and I was able to put another coat on a little later that day
(I used about 2 1/2 quarts of polyurethane).


 It fit perfectly in our new school room.


The rug has already gone through a spill of paint, some squished in play dough,
and a birthday party mishap of spilled nail polish.

Amazingly enough, I have been able to mop the rug as I do the rest of the floor,
and the paint came up, the play dough has been removed,
and the nail polish blends pretty well with some of the stripes.


For less than $100, we have a rug that works well for us in our busy room.


 Thanks for stopping by.
I really do hope to be around a bit more now that the past 6 months of packing, cleaning, clearing, sorting, and settling in have finally passed and I feel like I can breathe again.

I am so ready to have some art time back in my life!

What have you been up to lately?


Saturday, February 14, 2015

A Valentine Love Renewed: Recycled Crafting.


HAPPY VALENTINES DAY!


I wanted to share one more valentine decoration before the day passes by.


Frames seem to be a weakness of mine.
When I see them at yard sales or second hand stores,
if they are unique and sturdy,
 I tend to want to pick them up for future projects.


 This frame held a unique piece of artwork: a paper crafted quilt (maybe paperclay?)

It was dated.
 It reminded me of when my sister loved making quilts back when we were teenagers in the 80's.
It was hard to think about just throwing it away,
so I thought I'd try to revive it for Valentines Day.


Using markers, I started carefully changing the quilt colors.
(Wouldn't it be nice if we could do this so easily with real quilts when they fade or our color scheme changes?)


I also painted the mat and background bright colors to go with our living room.


The finished quilt in a frame was set on one of the living room tables.


This addition was a lot less work than creating a new piece of artwork;

and it is kind sweet to think that somebody else's lovingly created piece
is given a second time around to be loved.


Thanks for stopping by!


Monday, February 2, 2015

Valentine's Day Decorating: True Love.


For some reason, Christmas seemed to go too quickly this year,
and the thought of taking the Christmas things off the mantel was disheartening.

I was ready for my everyday things I had in the summer.

So I thought we'd make the winter a bit more fun with some Valentine's Day decorations.


 I noticed that my kids seem to learn verses better when they see them around the house,
so I thought I would create something from some wonderful verses I wanted them to know in 
I Corinthians 13.


To create the verse hearts, I started by folding a paper in half
and drawing half a heart shape on it,
pushing the pencil hard so that the pressure of the line would go through.


I then outlined the lines of the heart to complete it.


Depending on the verse I was going to work on,
I used fatter hearts for ones that needed more wording in the middle of the verse,
or thinner hearts for verses that were shorter and could be broken up more.


I lightly drew some lines with a ruler to help keep me somewhat straight while lettering,
and began trying to place the wording in,
(this took several tries, not such an easy task)
 using letters at the beginning and end of words to make curls and swirls
to form the outside edges of the heart.

When I had the verse the way I liked,
I rubbed charcoal pencil on the back of the verse page,
laid it onto a larger sheet of good art paper,
traced the letters so that they would copy onto the good paper,
and then worked the lettering with red copic markers.


 The largest one, I did on a canvas with paints because it had a lot of wording in it,
and I knew it would be impossible for me to try to fit them all on smaller paper.

When finished, I took pictures of each so I could shrink them to whatever size I needed
and then printed them onto cardstock paper.


I had picked up frames from yard sales, the charity store, and an aunt who was getting rid of some,
so I used gold rub-on gilding paint from a tube to turn the two that were different colored into gold
and to touch up a few chipped spots on the others.
(I also rubbed it onto the decorative hearts also on the mantel).


 The other pieces on the mantel were all things we found at the second hand charity store for a very small price.
(I was actually going to paint the birds like peacocks since I have a thing for them right now,
but  my daughter liked them as they are.

It's nice to have the daughter's impute...sometimes. :) )


I have one more simple project I did to decorate the living room for Valentine's Day,
so I'll try to post that in a few days.


Thanks for stopping by!


(If you would like to use these verse prints below for yourself for decorating or cards,
I am happy for you to copy and print them;
just not for resale, please.)


Sunday, March 30, 2014

When Colored Paint Helps Hide the Damage.


Hello!


  Sometimes I find it difficult to know whether to paint a piece of furniture or leave it as wood.  I love a mixture of the two around the house.  Take for example, this round table that my mother gave me.  I treasure this table and the beautiful carving all around the edges of the table top.


I needed to do something with it because the top was badly scratched and had bubbled and peeled varnish which made me feel like it looked messy all of the time.  I hid it with doilies for a long while but finally decided that I either needed to paint it or strip it.


Because of the detail of the carved wood and the fact that my life is filled with kids and so many other projects right now, I decided to give in and just paint it.


I used Annie Sloan Chalk paint which is a favorite of mine because it eliminates the need to sand or prime furniture.  I gave it a fun two-toned look:
white for most of it and then Florence blue on the top.  (I will admit that although part of the reason I painted it a different color on top was for fun, but also because the white made it look too obviously marred to me: the color seemed to hide the seriously marred top a little better.)

(I painted the frame with some Annie Sloane paint a previous day, but am not sure the color.
Annie Sloan paint seems to be useful on just about anything).

Of course, I love bold colors in my living room anyhow, so that was obviously a good part of the decision as well.


I sanded the whole thing after the paint dried to make it look distressed,
and then rubbed some Fiddes and Sons Rugger Brown and clear wax on it.


Painting it made me feel better about it's rough look and added color.
Of course, it is always whatever makes your house feel like your own home that works for each of us.

For me all too often, I have to admit, I opt for the easier route of paint.

 
Well, it is snowing here again...
I do hope spring comes soon as I am ready to head into the flower gardens.
We found a great couch for the basement this weekend off of Craig's List and it will be fun to show you that room all finished soon.
 
Thanks for stopping by!


Sharing at:

Thursday, February 13, 2014

Vintage Home Illustrations: Free Illustrations - Home Tour


 As I was looking for some ideas for making Valentines,
I started flipping through some vintage illustrations.


Something that I noticed about them,
is that often they have designs in the backgrounds.


 These images are surrounded by spherical garlands
and elaborated by the same spheres with curling rope-type images on the semi-circle frame.
It was called a "photo display frame,"
maybe an early rendition of our divided frames we use for family images.


 I found some more elaborate designs in this advertisement for
"Artistic House Furnishing and Decoration."


 The detail on this vintage magazine page is pretty amazing.


 Here is a cropped/lightened version.


I cropped even more into this image so you can see just how detailed this picture is.


 This looks like it may be the children's play room.
I wish I could see what is inside that cupboard door that is half open.


 Here is is lightened and cleaned up.


Even the border at the top of the room is fun to look at.
I love those crocheted curtains with tassels.


 Here is another zoomed in picture of one of the rooms.
They added pansies or violets around the outside of this image: a pretty division.


Maybe this is a parlor.

 Here it is cleaned and lightened.
Don't plants make a house feel alive and cozy?
(I would have to put fake plants up that high or they would never get watered!)
What fancy curtains and pretty lace underneath them.


This looks like an entryway or hallway of some sort.

 
Isn't the curved seating welcoming?
The elaborate wood carving above the doorway certainly took some labor to make.


I am not sure what this last room is.
Maybe it is the family living room.
I love the woodwork on the fireplace and the detail of the wall paper.


 It looks like throw cushions to add some color and design to the couch were a big thing then, too.
Some things never go out of style...
or maybe it is just that things of comfort never go out of style.


I had hoped to have an art lesson this week, but as it pertained to my children's valentines and I am not done with them yet, I decided to post this now and hope that I can finish the valentines tonight...
I guess I had better get to them!


These images are all free for use as they are from a late 1800's magazine.

Thank you for stopping by!


Tuesday, December 10, 2013

Christmas Home Tour: Home-made Christmas


Hello!

It is the time of year that many bloggers are sharing home-tours of their festive houses for Christmas,
so I thought I would join in.

Welcome to our home.


To say that I love our 1850 stone farm house is to say that I actually never dreamed I would live in something like it.  The story of how we came to own it is a host of answered prayers.
I need to write it down sometime, especially for the kids.


Of course, having all these animals wandering about is just icing on the cake:
such sweet feathered friends


(well, maybe not so much in the summer when they scratch the mulch from my flower beds).


 The quaintness and quirks of old houses seem to go hand-in-hand.


The thick outside walls and the fireplaces (which were built inside the home to help make the house warmer) uses up more inside space, making this living room smaller.

Of course, this also makes those wonderful deep window sills.


 This room has become a variety of things:
living room, wall cupboard full of school/art supplies,
music room,
and there is a little table on the other side of the piano for my daughter to do her schoolwork.


Isn't it funny that when young, we have ideas of how we will do things.


I remember thinking that someday I would have beautiful store-bought Christmas decorations,
leaving behind the colorful home-made creations we'd made to cover our tree as kids.


Then I grew up and found that I prefer the home-made ornaments over those that are either too fancy or too plastic.


This year, my 11 year old daughter helped me make the snowflake garland out of heavy paper, glue, and glitter: we'll wrap them carefully when Christmas passes and see if they can be used again in coming years.


The red horse bookends were picked up at a charity store: their gold color had chipped paint,
exposing the plaster they are made of.


(I mixed up some red paint with plaster-of-Paris to cover the slight gauges and painted them a cheerful red.)

  For the Christmas season, they put on some old greenery I had from a broken candle garland.


I painted the slate for the craft sale this year and hung it here when it didn't sell.
It is painted from an old image I found in one of my vintage books.
(I will post the image in a few days for others to use: it is too pretty not to share).


The white trees on the mantel are made of cereal boxes.


They were cut and pasted, painted with several coats of a thick mixture of white paint and plaster-of-Paris,
allowed dry for about a week, and then painted with glue and doused with glitter.
They were last year's craft.


The green pine trees in the old silver sugar and creamer are artificial moss covered cardboard cones.
I didn't want to part with the sugar and creamer, so they were salvaged for these trees.


The grapevine star was decorated with a rusty canning jar lid,
rimmed with red paint.


The stars are made from toilet paper roll cardboard.
I sliced them, painted them red, crinkled them into star shapes,
painted glue on them, and then covered them with clear glitter.


(I hope to post how to fold these star shapes easily in the coming days.)


We got our tree from my sister who planted about 100 of them a few years back.
I left it unpruned, opting for the natural, wild look
(If I admit that it just slipped my mind until I saw these pictures,
does that count as wanting the natural look?)


The kids helped me decorate the tree with our 'colorful' variety of ornaments.

There is an assortment of canning jar lid ornaments.
Because we can so much of our food, it is hard to just throw away all those little discs when I pop them off the jars.  Some of them usually end up getting made into something.


(I hope to share a post in the coming days of my canning jar lid ornaments...
for any of you out there who are as much of a pack-rat.
I am sure many of the same ideas could be used for regular jar lids).


(The striped table in the center of the room was one I found for free by the side of the road and painted up.  The rocking chair was my husband's grandfather's chair.)


The snowman painted cupboard door was another craft sale unsold item that my daughter claimed.
It sits on the window by her school table.
The old frontier house was created by my husband's grandfather.


These silver trees are made from something recycled.  Can you guess?
 I have a visual step by step I hope to post sometime soon for these as well. 
The snowman was made from a styrofoam ball covered with newspaper papier mache'
and then painted.


These music-box carolers are in the window near my daughter's school area.
I got them somewhere and the head was broken off of the child.


I crafted a new head as well as the baby in the mother's arm from some clay a few years back
so that they would better fit our family size.
 They were a gift to my daughter who likes musical decorations.
(Don't look too closely: it was my first attempt at crafting with that clay and it is a bit rough.  She liked it, so we keep it).


 This little dresser was one a friend gave to me to refinish.
The sled is from a yardsale and I filled it with some greenery.
The older lady I bought it from said her son had made it for her.
I love that it was home-made.


Let's go in the room that gets the most use.


In our kitchen, I used real evergreens pieces.
It's funny because the lady who used to own our farm just sent a Christmas card today.
She mentioned that they used to cut a tree from the farm every year for their Christmas tree,
but that they were probably too big now to use for that.

Yes, they are about 20 feet tall now,
but I trim some of the branches for use in here, so they still make it inside to spread their cheer.


By the time Christmas gets here,
they may need to be replaced or their cheer may be shedding needles,
but I have found it is just as easy to clean up the mess and throw it outside
than to store it all in the attic.


I have to admit also that I am usually so busy trying to get things done for Christmas,
I don't dust all these high places before I put up the boughs.
It will get done after Christmas because the dried boughs will make it happen.


The kitchen windows are so sunny in this house.
I love the kitchen.


I sewed the curtains from an old torn table cloth that was my grandmother's.


Isn't the color of old cobalt blue pottery stunning?


 I made the trees by the blue pitcher below as well.


Perhaps I will get that tutorial on here before this season is passed.


The red cereal cupboard is topped with old pieces from several relatives.


I change the plant piece in the old bottle
as well as the picture in the glass canning jar lid depending on the season.


I found this sweet candy cane image from the Graphics fairy,
printed it on tan paper, cut it into the circle shape,
and then crinkled and finished it by tea-staining it.


The top part of this cupboard was one my aunt found
 and gave me.  My husband found recycled cupboard doors that fit and attached them for me,
and then I painted it.

The bottom half was purchased at a yard sale.
(The top surface was badly chipped veneer,
so we pulled it up
and I painted a slate look on it with some slight images of birds and vines.)


Off of the other side of the kitchen is the office.
Two of the pictures on the wall are silhouettes of our children painted on the glass of old frames purchased at a yard sale.


I put just a few things in the bathroom to make it festive:
a gift from my father.


The house was a gift from my daughter when she was nine.
Her hard earned dollars were used to buy it,
and I think it is sweet next to a vintage tree.


(The dragon verse on the chalkboard hopefully will be changed before Christmas.
It was put on there for my son...one of his favorite subjects right now.
I hear him reading it every time he goes in there, so I hate to change it yet.)


The window in the office looks back on what used to be the back porch,
but it is now enclosed and our real "living" room.


(This small white tree was rescued from the charity store and put into a pot with some plaster-of-Paris to give it a new base.
I consider it my tree: I decorate it with some simple ornaments we made that have more of a the vintage look that I like.)


The back porch is big and sunny;
 It is my favorite room.


This table is where I teach school
and is most often graced with books and crafts.

We do clear it off and have holiday meals out here;
the table gets turned long-ways to fit more people.


The view is so peaceful.


I remember everyday for a month or more coming out here when we first moved in and pinching myself to see if it was real.


I don't decorate much out here except this corner
and the table when it is set for Christmas dinner.


My sewing machine sits in front if this window looking into the office.


I wanted snowflakes to hang here.
The plastic snowflakes looked too...
well, plastic,
so I made these from the cardboard in paper towel rolls.
I sliced and then curled them like quilling;
glued and painted;
then painted glue and dipped them in clear glitter.


Thank you for stopping by.

This was a long post:
I'm hoping it showed that even the simplest things can be turned into cozy creations for the home,
or at least personalized decorations...

all to suit your own style.

I love the things we have made and the home God has allowed us to live in.
The challenge of using little to create it has been rewarding...
and fun.


If you don't come by again,
I hope you have a joyous, Merry Christmas!


Sharing this tour at these blog parties:
Jenniferrizzo.com: Show-us-your-holiday-home-linky-party
Thehappyhousie.com
Abowlfulloflemons.net
Thenester.com: Welcome-to-the-2013-christmas-tour-of-homes
Thegraphicsfairy.com
Wearethatfamily.com
Betweennapsontheporch.net
Theprairiehomestead.com
Savvysouthernstyle.net
Homestoriesatoz.com
Nominimalisthere.blogspot.com
Missmustardseed.com
kellyskornerblog
Craftberrybush.com
Bystephanielynn.com
DIYshowoff.com
(http://wp.me/p3Su5W-3dv)