Showing posts with label colored pencils. Show all posts

Tuesday, October 15, 2013

The Artist: Mary Engelbreit


 (This is a book about Mary Englebreit full of her wonderful illustrations and her encouraging story and words.)

"I taught myself by copying, but if you do that long enough, you start drawing your own little people, which for me happened when I was just about eight." - Mary Engelbreit

Mary's success in her art is shown by her over 6,000 pieces of artwork.


Mary Engelbreit is a favorite artist of mine.  
(Yes, I suppose I have several favorite artists, but I have admired Ms. Engelbreit's work for most of my life).

I just so enjoy her bright colors and unique style. 
The creative way that she frames her artwork in patterns and designs punctuates the fun and draws the eye in.

I love that Mary never went to art school.
She is a picture of success by keeping to her own style of art and by her hard work.

Mary graduated from high school and went on to work at an art store where she met and was encouraged by the working artists that came in.
She then worked at an ad store where she garnered even more knowledge.

(To see her selection of books, click >HERE<).


Her style of creating art is this:
Mary does her entire piece of artwork on one page: she doesn't sketch her pieces out first.
She starts the artwork in pencil.
Mary then uses micro pen to ink it in.
Next she uses markers to color it: Prismacolor, Copic, or Tria.
She finishes the piece with Prismacolor colored pencils.
Each of Mary's artwork pieces take anywhere from 40 to 100 hours.

(source: Pinterst from the live interview with Mary Engelbreit).
Mary does not sit down to draw everyday at a scheduled time.
She says that creativity hits at times and she jots that idea down so it doesn't get lost,
sometimes even on the back of a napkin.
Mary says her favorite place to work is in her home studio,
late at night when it is quiet
(I love that.  I can relate!)

Ms. Englebreit has created many inspiring quotes. Some of my favorites are:

“One loses many laughs by not laughing at oneself. ”

 “Walk towards the sunshine, and the shadows will fall behind you.”

"Happiness must be grown in one's own garden. ”

"If your ship hasn't come in, swim out to it.”

 ----Mary Engelbreit (from Goodreads.com)


To see some of Mary's fun artwork, click >HERE<


To see Mary's live interview offering helpful tips on what she's learned about marketing artwork, click >HERE<.

Other great interviews that were used for the info on this blog post are these: >www.maryengelbreit.com<
>www.harpercollins.com<


Thanks for stopping by!


Friday, August 2, 2013

Art Lesson: Seeing and Drawing in Reverse.


My art lesson this week is very late, and I am sorry about that.
I have been determined to get the cushions covered on the chairs on the front porch before summer passes.


Here they are.


Here they were before.
As you can see, they were in desperate need of attention.


Here they are looking off the porch from the other direction.

I used three different  materials on them as I got the material at a discount store and there wasn't enough of one.


I thought the contrast of the three materials would give some variety.

I hope to cover a couple of throw pillows in the orange and dark purple for the couch as soon as the old pillows I washed to recover are done drying on the clothesline.


I put the screen I had painted sometime back out on the porch to block the trash can/recycling can.
I think I may put a hook and chain and attach them to the wooden ceiling so that they don't blow over when it gets windy.

It is nice to finally have the porch as a good place to sit.
The cat Moon thinks so, too.  I think he may be the new couch hog.


Now on to the lesson.


When doing art, it is easy to draw the basic outline of whatever it is we are attempting to draw,
and then color that in.


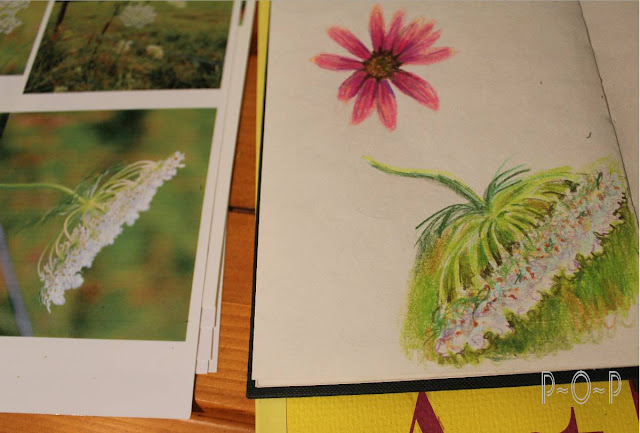
Take for example, this echinacea flower above.


Once we get the basic outline and color on the paper, we then proceed to shade and add the detail.


Sometimes, however, it is essential to look at whatever it is we are drawing from a backwards viewpoint, drawing the outside of the object without drawing the object,
usually because it is white.


 This stretches the brain
(or perhaps I should say, it uses a part of the brain that we do not use a lot).


  I always find myself feeling a bit disagreeable when I have to use this reverse thinking,
but I know it is very good at stretching one's art abilities and forcing the brain to draw what it sees rather than what it knows.


I recently had to do this and the image in my sketch book, above, was a practice sketch.


I wanted to do a piece of artwork of some Queen Anne's Lace.


It is such a simple beauty, but I knew it would be hard to capture it's detail.


I decided to do the piece using my Prismacolor colored pencils.

First I sketched what I wanted onto tracing paper.


Because this is a white flower, I did not want to use anything too heavy to transfer it onto my good paper, so I just rubbed the pencil I was using onto the back, it being a harder lead.


I then flipped it over onto my paper and lightly traced it on.


I then started a bit of shading.


I find when I am doing a white object,
the background is going to receive more attention to make the white stand out.
I got to a certain point of my shading and decided to start adding in the background to help me visualize the white space better.


 Because the background of these flowers is blotchy, I did not feel I needed to put in all the background base color at one time, but chose to work in sections.


The picture looked nice enough to me at this point


(I tend to be afraid to keep at something for fear I may mess it up if I overwork it,
most likely because I have ruined projects by not quitting when I should have).

I could have stopped here, I think,
but my daughter said she thought the original photo was just so beautiful,
 I decided to work with it a bit more.


I find when working with a detailed project like this that requires a lot of reverse thinking,
I have to stop after a time and put the piece aside.

A fresh start the following day always feels great and gives a renewed look to pick up colors and areas of new work that may have been missed in the previous sitting.


 I have worked on this piece for two evenings, and am hoping I can finish it on the next evening I sit down to it.


Do you find you have to put some art or painting projects down and come back with renewed focus?

Have you ever tried to draw or paint something white?
Be daring and take the challenge this week and stretch your abilities.
Give yourself time to work on it when you don't feel hurried or pressured as it is helpful to be relaxed when working on something that requires this kind of thinking,

Work a practice run in your sketch book first.
You'll be glad you did.


And, as always, thanks so much for stopping by to visit!


(For those of you who may be wondering, I haven't forgotten the unfinished duck painting.
I plan to finish it to enter in the fair.  I just set it aside because I had to do this project for a specific reason.)


Linking up to these fun blog parties:


Wednesday, April 24, 2013

Colored Pencil Bear: Drawing from Book Images.


(Here is the sketch I will use to teach today, as well as the colored pencils that were used).


Hello, and welcome back to another lesson in art.


A good exercise in art is to draw different animals.
There is so much variety in animals, and it is always a fun undertaking.
Of course, animals are not ones to sit still and pose, and it isn't always easy to wrangle up a polar bear for a session from which to paint.
This is where books and magazines come in handy.


My son received this Animal Encycolpedia as a Christmas gift from his grandmother.
I immediately knew that I would be borrowing it from him.
It is the nicest book I have ever seen of animals, such a huge variety and they are all real pictures, not drawn ones.
(Of course, I do appreciate drawn pictures, I just like to draw from real ones.)


I picked up this book the other week and decided to sketch a bear.


I started with the lightest color I could distinguish in the bear's fur, and sketched the outline of his head.
It isn't necessary to erase all the lines since the color will blend in with the colors that are added.


Next I measured with my pencil where the eyes were on the head
and lightly drew in some lines to place them.


From there, I lightly marked in the bears features:
nose, mouth, ears.


I darkened some of those features that I felt confident were in the right places...


 and then added in some colors for shading around the eyes, his mouth, and the edge of his head.


At this point, I sat back and looked at the original bear picture, and my own,
and really critiqued how things were going and what needed to be fixed.
(I try to do this along the way, of course, but at this point, I could sees something was off).

 Can you see what it was?

Look at the bear's head from his eyes to the top of his head.
My bear's head is not tall enough over his eyes and between his ears.

Thankfully, this can be fixed by extending the head and ears with the original lightest color,
and then working to blend them in.


Next I went a bit heavier with the reddish brown,


and then darkened around the eyes, nose, and in the fur with a brown/black.


As the shading continued, I found it helpful to edge in the dark fur at the top of his head.


 Legs were darkened it.  This helps me see where the boundaries of his head are.


When I had my bear to the point where I felt finished, I went back with some of the lighter colors
and blended the fur in at certain places, to get rid of any underlying white.


He was a fun sketch to work on.


 Do you have any books with real animal pictures in them?
If you do, try sketching one soon.  Take your time, be patient, and draw what you see.
There were several times in this sketch that things looked terribly wrong to me and I wanted to quit,
but patience was worth it for me this time.
No, my bear isn't perfect, but I like the way he turned out, and he was good practice.

Remember, practice makes perfect.


 Until next time, thanks for stopping in!

Wednesday, April 10, 2013

Sketch Book


This week's lesson is about having a sketch book,
a place to practice and journal your art endeavors.


Do you have a sketch book?

 (They are also called 'art journals'.)


A sketch book is a great tool for every artist.


For this blog, I purchased a sketch book.


It is a handy place to keep my thoughts all together.


 An art journal is helpful for drawing the things you see around:
a person, place, or just something you want to capture on paper.


It is a great place to practice drawing because it is just for fun,


just to practice.


When something doesn't turn out as expected...


 it can be a stepping stone for next time.


Instead of using pencil, one might chose to use a light color of the image
to sketch out the basic shape.


New attempts can be made,


sometimes right away,
sometimes a little while later.


Instead of drawing what one thinks should be there,


one must train the eye to pick out what is really there...


and draw what one sees.


If you can, get a sketch book to capture your practice,
adding dates and some words.

If you have a picture of something you were attempting to draw,
glue that to a page, if you'd like.


It is your book to use as you please:
your tool to be shaped to your hand.

Someday you'll be able to look back and see,
not only some great memories,
but terrific improvement as well.


 And it is an enjoyable way to get a few minutes of art into some spare moments you may find.


If you have a sketch book, do you have a favorite page?
If you don't have one, please try to make room in your plans for one very soon in your future.
 You'll be glad you did.


This is part of my free art lesson series each week.
To see the full list of art lessons, click <HERE<.

Sharing at:
Funkyjunkinteriors.net
Lifeingrace
Newlifeonahomestead: Homestead-barn-hop  
Betweennapsontheporch 
Iheartnaptime