Showing posts with label signs. Show all posts

Thursday, May 22, 2014

Art Lesson: Watercolor Painted Vintage Wall Art


I was feeling the need to make my mantel sing of spring,
so I dug up these old wooden oval pieces I had once painted on and decided I did not like.
I decided to paint the edging of these ovals in black.


I found some vintage images on the Graphics Fairy of birds and printed them up in the center of each page by pasting them into Word and situating them to the size and place that I wanted them.


 (We've had a visiting blue jay to our yard in the last 2 weeks who is as blue of a blue jay I have ever seen).


I wanted to add a bit of color, so I splashed water all over the page with a paint brush
and then added some blue
and then some touches of red.


 Once that had settled into the paper a little bit,
I began painting the bird with a darker and less watered down blue.


 I filled in the leaves, branch, and flowers as well.


 Once the jay was done, I followed the same process for the Robin picture.


It is always a nice break to just paint an image that is already all drawn up for you.
Who doesn't love a bit of coloring-book style painting?


 I let these dry thoroughly and then cut them to fit into the oval shapes
(I did this by tracing the full oval shape onto the page and then cutting it down evenly on all sides until it fit, but a piece of tracing paper would also work to be more precise.
Laying it into the frame and running a pencil around the inside edge carefully should work).

Once I had them cut, I spread glue all over the backs of the images and then pasted them into the ovals, using paint containers to hold the image down on all the edges.


 Wanting a more vintage look, I heated some water and, using a damp teabag,
dabbed the warmed tea bag all over the image until it was stained as I wanted.
(This could also be done before gluing the image into the frame).


 The teabag was so used up, it cracked at bit and shed some bits of tea onto the images,
but I left them there to dry to add more character.


Once dried, I painted two coats of Mod Podge, allowing the first coat to dry completely before applying the second coat.
I then applied a squeeze of Martha Stewarts all purpose gloss paint from the bottle it comes in around the edges to make them look sealed in to the frame.  I used a paint brush to carefully brush it in and a few damp q-tips to clean up any smears.


Here they are all finished.  Can you see the difference with the Mod Podge?
The shine makes them look more like framed pictures.


I then put some frame wall hangers on the backs of the bird art
and hung them over the mantel in the living rooom


They added a touch of quaint, older looking decor to the wall with no expense at all:
I just recycled and used the supplies that I had...
aren't those the best kinds of projects?

Have you added any spring to your home this season?


I am still working on the bee picture.
It is coming along pretty well, but I am trying to wait until it is all finished before I share the processes I tried with it.

Thanks for stopping by!

Wednesday, May 29, 2013

Art Lesson: Painting Colored Images on Dark Backgrounds.


For today's lesson, I thought I would show you a painted project with some tips along the way.

I had a little wooden sign that I picked up.

I sanded it down a little bit and then measured it for the image I wanted to put on.


 I added the word "freedom" to the banner I found at the Graphics Fairy using Word.
Then I printed up the banner and colored charcoal pencil on the back of it.
 I cut the image just a bit smaller than the board size so that I could see to place it centered on the board and then taped it down.
I then traced over the image with a pen on the top side, causing the image to pass onto the board
(I did not need to trace over the lettering and fine detail at this time: just the outline of it).

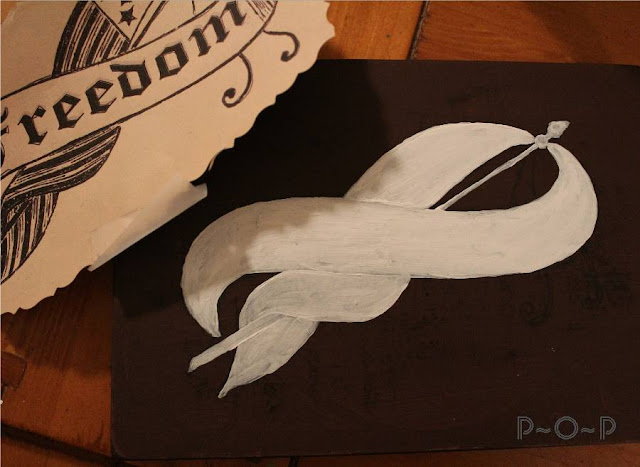
 After I took the paper off, I painted the whole image white.

The reason I did this was because, it being on a dark background,
if I just painted the colors that I am going to use directly onto it, they would not be as vibrant as I want.

I will show you what I mean.


 First though, let me show you that after the white paint dried (and I did two coats of it),
I cut the paper banner out exactly on the outside edge of it and then colored the charcoal pencil on the back of it again. I carefully taped it onto the dried painted white banner.


 I then traced the top side of the graphic so that the detail was now on the white painted banner.


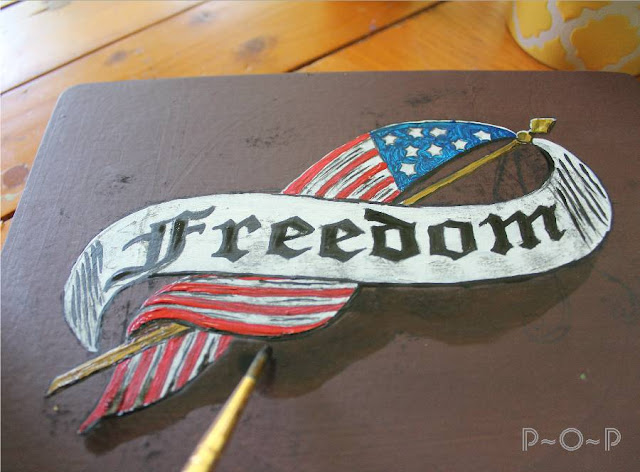
After carefully removing the taped banner, I began painting the colors using one of my favorite small paintbrushes.
(Do you find you tend to have a few favorites?)


 See how bright and crisp the colors show up on the white?


For the flag pole, I decided to mix some yellow with gold to give it a slightly shiny look.

(Please excuse my paint pallet: the bottom casing from my frog tape.  
I tend to use what is in my supplies and this does make a handy plate of paint.)


I used this gold/yellow also on the circles border I put around the edge, mixing in just a touch of black on those to give them some dimension.


I outlined a few parts of the banner with some black,
mostly on the lower parts of the graphic to look like shadowing and to help define it from the brown background.

I also added some water to some black and painted a smeared black background in around the banner. 


 While this dried, I added the gold strings handing from the flagpole and let them dry.


I wanted to make the blue in this image pop more because I love blue canning jars and thought this would look pretty displayed with some, so I added some water to my blue to make a blue background over the top of the dried black one.


 This is where the difference can be seen between the blue on the white background of the banner and the blue on the dark background.  The blue on the white is bold whereas on the dark background, it is muted.

I painted a coat of this watered down blue and then while it was still wet,
I painted a thin line of black around the outside edge of the blue background,
blending it with a slight circle motion slightly into the blue.


 I felt it still needed just a touch more of blue, so I dipped my paintbrush in it
and swiped a few more bold blue strokes across the background.


After the whole thing dried well, I wiped off any excess charcoal markings and slightly sanded the wood to give it an antiqued look,
finishing it with a brown stain wax.


It is just a small decoration, but it will work well for the 4th of July as well,
and being small, it is easy to store.


Have you painted anything lately? 
Paint is such a different medium to use after so much of the colored pencils and markers I have used lately,
but it is a fun change.

Thank you for stopping by!


Sharing this at these blogs:
Gnowfglins.com
Thegraphicsfairy.com


Thursday, May 2, 2013

Art Lesson: About Paintbrush, Pen, or Ink


My lesson for this week is a day late; I am sorry about this.


There is quite an assortment of options to be used in getting artwork onto the page
but also onto crafts as well.
I am going to share with you some of the methods I use and why
(not that you have to use mine because much of what an artist uses depends on what he is most comfortable with and the surface he is applying it to.)


First we have paint pens.

 Paint pens are a handy way to tackle those fine lines.
You can get a variety of these pens, oil and acrylic,
or a specialty type for glass.  They come in several tip thicknesses as well.

I have used them on signs and to draw on glass.
I do not prefer them because I don't feel like I have the control over the flow of ink that I like:
I find that as I write, the tip does not make an even line but becomes dry.
In order to get the flow going again, the tip needs to be pushed down upon.
This always seems to make a large puddle come out from the tip.
(I recommend pushing the tip down on a scrap paper, so that the puddle is contained there, but then I find I am going back to rewet the tip in that puddle since the tip stops flowing evening quickly.
Perhaps you can find an alternative to this problem, but I have not been able to.
Please share with me if you have.)


I have used them for certain tasks despite this problem.

I have used them on fabric:


For the horses on this seat, I used a paint pen,
using a scrap paper to re-wet the tip when needed.
(Images from the Graphics Fairy and transferred using the charcoal-transfer method)

I felt the pen gave me more control on the fabric to draw the fine lines that would have been much more difficult with a paintbrush.  I knew the ink would not bleed on the fabric because the fabric had been painted first, giving it a sealed surface.


This sign made from an old cupboard door center piece was done using the paint markers,
but I think I would have actually preferred a fine paint brush.  
This is  personal preference just because I like how easily paint on a paintbrush glides onto a soft, smooth surface like this was.  My paint pen needed to constantly be re-wet on a scrap paper and I find this more tedious than painting with a paintbrush; but again, this is a personal preference.  If you feel more control with a pen, you may like the pen method.


For doing drawings on paper, such as for a coloring page or a drawing for a card,
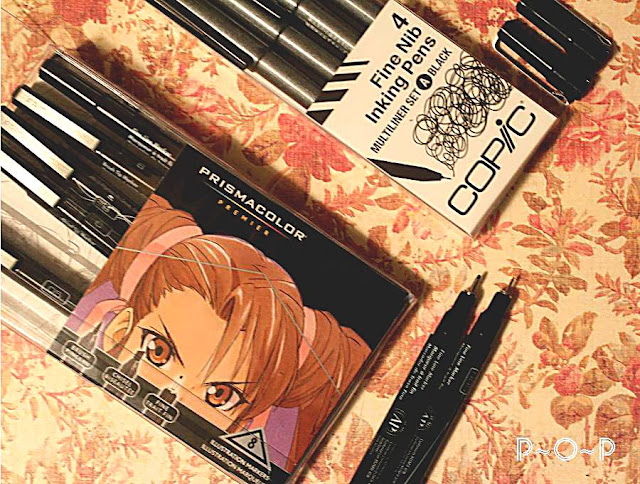
I like to use these art markers.


 I picked up the Prisma set at a Staples store,
and ordered the Copic markers through Dick Blick Art Supply.
These are nice because the ink color will not fade as cheap markers will;
these are alcohol-based so they can be painted over as well with paint or markers,
and they have various sized tips.


For this method, I generally start with a light sketch in pencil and then draw over the image with the pens, lightly erasing the pencil when the ink has set in.
(Sketching directly onto the paper with these pens is a great option, too).
They give a crisp, clean look.

(This is from part of a coloring page I am in the process of making.)


Another of my favorite outlining methods is using a dipping calligraphy pen with interchangeable tips
and dipping ink.

Here is a warning: the kind of ink that I find at the craft stores is Higgins.
It says that it is waterproof, but I have not found it to be.  I like inks that I can paint over, if I choose to, and I find that these inks bleed into the paint or wash completely off of crafts that I have used them to draw on.


When looking for an ink that will really be permanent and allow you to paint over it without smudging it,
I find that getting a shellac based ink, an Indian ink, or an acrylic based ink is permanent.


There are an assortment of colors to chose from; I purchase mine through DickBlick.com online art supplies because I also like to read the reviews; although much of what I have learned from these inks is from trial and error.

There are many different tips that may be used.

Be sure to clean them when done using them.  Using permanent inks will stain your tips.
 (Honestly, I actually just rinse mine in water right away.  I know that technically, mineral spirits or such should be used,
but I don't like to keep that sort of thing sitting around because I have young children, and I find water does a good enough job at rinsing if the pen is thoroughly whisked around in the water immediately after use.  If my tips get too abused, I just purchase new ones.  I have only purchased new ones 2 or 3 times in my 20 years of using my dipping pen, so it is not a real problem.  I use my dipping pen a good amount, too, as it is one of my favorite methods.  I suppose if I used an expensive dipping pen, I would take care of it properly, but I find this inexpensive version works well and affords me this easy clean up method.
If you are a real artist, please, find it in you heart to forgive me for this. :) )


I often use a piece of charcoal pencil (or sketching charcoal) to lightly sketch in my design before using the permant ink when using dipping pen and ink on crafts.  This wipes off easily after the ink is dried.


I use the dipping pen to paint on small large objects (like artwork done on a slab of wood or repurposed cupboard door), and small objects (like Christmas bulbs and gourds)


I liked to draw the image on and then paint it in after the ink has thoroughly dried.
This method is easiest for me to control,
but you may find you prefer something else...


like the simplicity of a fine-tipped paintbrush and paint.

The choice is up to each artist, and with the variety that is available,
there is always a method for each of us.

Let me know what your favorite is.
I always enjoy hearing different methods and tips we can try.

That is what is great about sharing our pails of paint.