Showing posts with label glass paint. Show all posts

Saturday, October 19, 2013

Art Tip: Repurposing Ornaments with Paint.


Hello!

Today I am sharing a simple tip for making a gift more...

personal.
(If you are a Hallmark ornament collector, you may not appreciate this post,
so you may need to look away.)
 
I know it is a bit early for Christmas, but thought this tip might be helpful as we head into the season soon.

Every year at Hallmark,
I see the ornaments from other years deeply reduced for sale because the date on them
is past.


 When my son was a preschooler,
David and Goliath was his favorite story.
He loved the song.

Hallmark had one of those great discounted ornaments,
but the date was old and the year wasn't even meaningful in some way to our family
(Was anybody born that yeat?  Did anybody do anything special that year?
What year did we get the puppy?)

So I decided to "fix" it.


 I used some paint that works great on glass and plastic
(Should I mention her name since she was kind of hard on us bloggers?
That's okay; everybody makes mistakes.
  Bitterness never gets anybody anywhere, and I do so love her all-purpose and glass paint.  I'm not an expert on it or anything, but I find it works very well).
:)

 I painted the book binding with the gold paint, and it hid the year that had been there.


My children have unusual names,
so finding them the personal ornaments can be difficult.

I used the paint on these to remedy that as well.


Once I had painted the gold over the names that were there and let it dry,
I then drew on my children's names using a paint pen.
Oil based permanent marker paint pens work great, too.


It seems a shame that all those great ornament sit on the shelf because there aren't enough Sarahs and Matthews in the world,
 so this is a great way to repurpose something at a great price.


Do you have any helpful ideas for easy fixes?

Thanks for stopping by!


Thursday, May 2, 2013

Art Lesson: About Paintbrush, Pen, or Ink


My lesson for this week is a day late; I am sorry about this.


There is quite an assortment of options to be used in getting artwork onto the page
but also onto crafts as well.
I am going to share with you some of the methods I use and why
(not that you have to use mine because much of what an artist uses depends on what he is most comfortable with and the surface he is applying it to.)


First we have paint pens.

 Paint pens are a handy way to tackle those fine lines.
You can get a variety of these pens, oil and acrylic,
or a specialty type for glass.  They come in several tip thicknesses as well.

I have used them on signs and to draw on glass.
I do not prefer them because I don't feel like I have the control over the flow of ink that I like:
I find that as I write, the tip does not make an even line but becomes dry.
In order to get the flow going again, the tip needs to be pushed down upon.
This always seems to make a large puddle come out from the tip.
(I recommend pushing the tip down on a scrap paper, so that the puddle is contained there, but then I find I am going back to rewet the tip in that puddle since the tip stops flowing evening quickly.
Perhaps you can find an alternative to this problem, but I have not been able to.
Please share with me if you have.)


I have used them for certain tasks despite this problem.

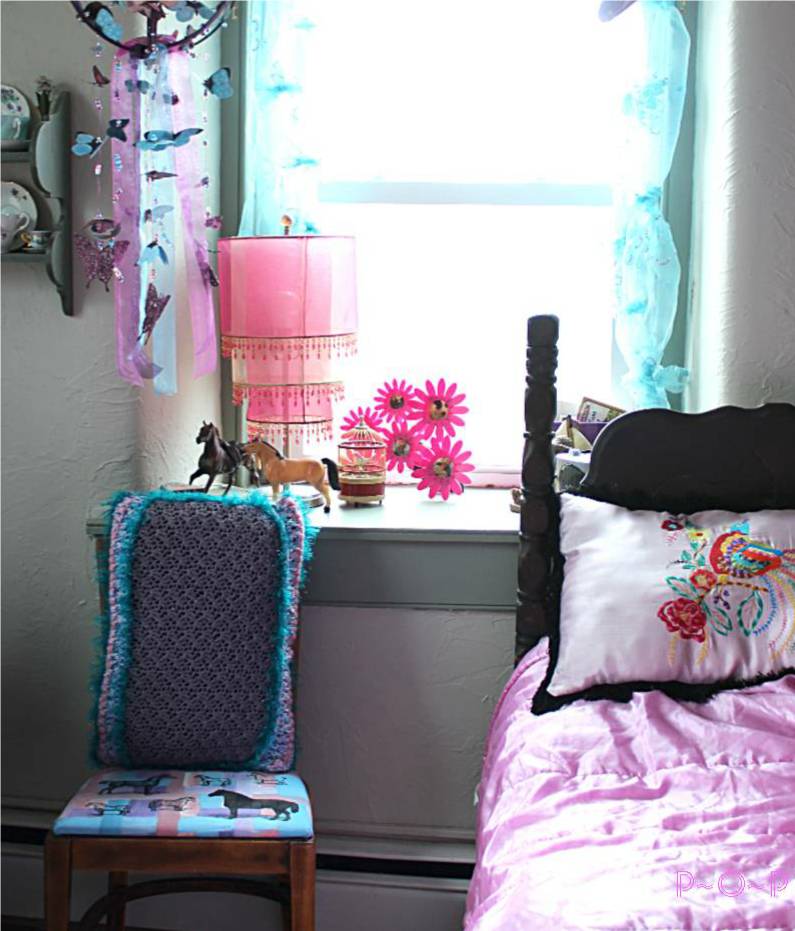
I have used them on fabric:


For the horses on this seat, I used a paint pen,
using a scrap paper to re-wet the tip when needed.
(Images from the Graphics Fairy and transferred using the charcoal-transfer method)

I felt the pen gave me more control on the fabric to draw the fine lines that would have been much more difficult with a paintbrush.  I knew the ink would not bleed on the fabric because the fabric had been painted first, giving it a sealed surface.


This sign made from an old cupboard door center piece was done using the paint markers,
but I think I would have actually preferred a fine paint brush.  
This is  personal preference just because I like how easily paint on a paintbrush glides onto a soft, smooth surface like this was.  My paint pen needed to constantly be re-wet on a scrap paper and I find this more tedious than painting with a paintbrush; but again, this is a personal preference.  If you feel more control with a pen, you may like the pen method.


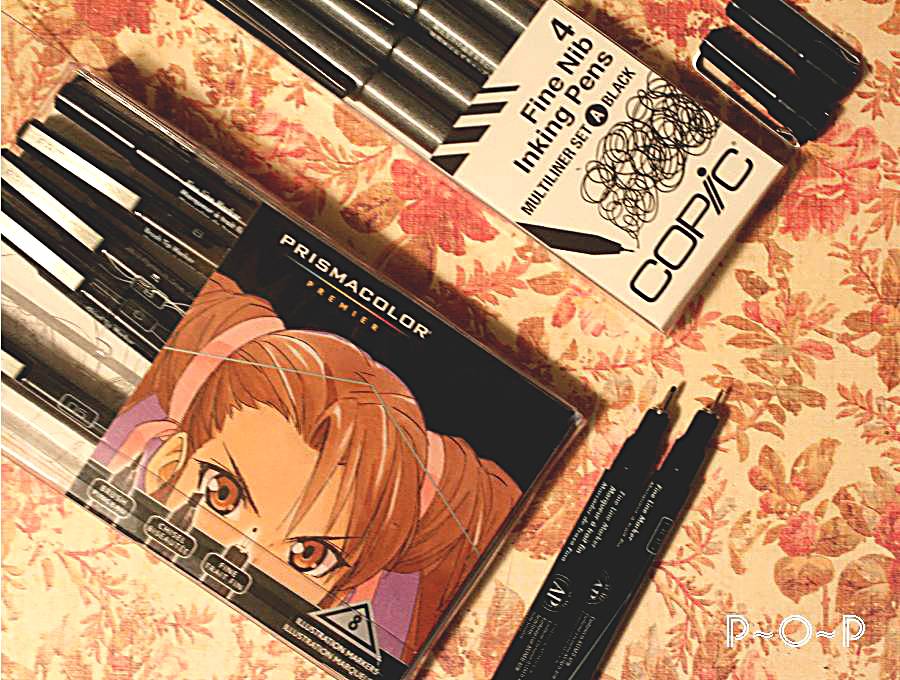
For doing drawings on paper, such as for a coloring page or a drawing for a card,
I like to use these art markers.


 I picked up the Prisma set at a Staples store,
and ordered the Copic markers through Dick Blick Art Supply.
These are nice because the ink color will not fade as cheap markers will;
these are alcohol-based so they can be painted over as well with paint or markers,
and they have various sized tips.


For this method, I generally start with a light sketch in pencil and then draw over the image with the pens, lightly erasing the pencil when the ink has set in.
(Sketching directly onto the paper with these pens is a great option, too).
They give a crisp, clean look.

(This is from part of a coloring page I am in the process of making.)


Another of my favorite outlining methods is using a dipping calligraphy pen with interchangeable tips
and dipping ink.

Here is a warning: the kind of ink that I find at the craft stores is Higgins.
It says that it is waterproof, but I have not found it to be.  I like inks that I can paint over, if I choose to, and I find that these inks bleed into the paint or wash completely off of crafts that I have used them to draw on.


When looking for an ink that will really be permanent and allow you to paint over it without smudging it,
I find that getting a shellac based ink, an Indian ink, or an acrylic based ink is permanent.


There are an assortment of colors to chose from; I purchase mine through DickBlick.com online art supplies because I also like to read the reviews; although much of what I have learned from these inks is from trial and error.

There are many different tips that may be used.

Be sure to clean them when done using them.  Using permanent inks will stain your tips.
 (Honestly, I actually just rinse mine in water right away.  I know that technically, mineral spirits or such should be used,
but I don't like to keep that sort of thing sitting around because I have young children, and I find water does a good enough job at rinsing if the pen is thoroughly whisked around in the water immediately after use.  If my tips get too abused, I just purchase new ones.  I have only purchased new ones 2 or 3 times in my 20 years of using my dipping pen, so it is not a real problem.  I use my dipping pen a good amount, too, as it is one of my favorite methods.  I suppose if I used an expensive dipping pen, I would take care of it properly, but I find this inexpensive version works well and affords me this easy clean up method.
If you are a real artist, please, find it in you heart to forgive me for this. :) )


I often use a piece of charcoal pencil (or sketching charcoal) to lightly sketch in my design before using the permant ink when using dipping pen and ink on crafts.  This wipes off easily after the ink is dried.


I use the dipping pen to paint on small large objects (like artwork done on a slab of wood or repurposed cupboard door), and small objects (like Christmas bulbs and gourds)


I liked to draw the image on and then paint it in after the ink has thoroughly dried.
This method is easiest for me to control,
but you may find you prefer something else...


like the simplicity of a fine-tipped paintbrush and paint.

The choice is up to each artist, and with the variety that is available,
there is always a method for each of us.

Let me know what your favorite is.
I always enjoy hearing different methods and tips we can try.

That is what is great about sharing our pails of paint.


Sunday, April 28, 2013

Repurposed Old Window Painted Stained Glass.


We have an enclosed back porch, and there is a window that looks out from the office onto it.
I have wanted to find a large stained glass piece to put in it, but the price of something this size was well over $300.
I decided to create one using paints and an old six paned window I picked up for a few dollars at an antique store.


A few weeks ago I shared a small painted stained glass piece I did using Martha Stewart gloss glass/craft paints.
That was my trial piece for the large window piece that I wanted to create.


After cleaning the window off and washing with alcohol, I divided each pane into the sections I wanted to create, using cut up 4" by 6" cards.  I used a dish to mark where I wanted the middle design to be.
I traced these one with a dry erase marker (a transparency marker would work as well).


Once I got the images the way I wanted, I used the black gloss opaque paint to outline the images.  I piped this right onto the glass right from the container using the fine tipped lid (trying to be consistent in the flow of paint). 

(I later realized for a stained glass look, mixing silver with black into an empty container and mixing them well gives a more realistic "lead" look, but this simple black look is also very pretty).


This should be allowed to dry thoroughly for a few days.  Otherwise, when adding the other colors, if brushed against too much with a paint brush, the black may start to loosen and shift.


 Once the black is dried, the colors may be added in.

I found that opaque paints may be used but should be mixed by about half and half with liquid fill,
and then painted in with a brush.

I used opaque paints for the red, yellow, pink, orange, blue, purple.

 Colored liquid fill may also be used, but since I already had some of the colors in opaques, I decided to use them and just add some transparent liquid fill to water them down.
These should be mixed by about half and half with liquid fill,
and then painted in with a brush.


To create a more realistic "stained glass" look, I found the following method worked best.
 Using two different color greens and a clear, I mixed them together on my palette.


I then painted them into the space that I wanted green.
(Using two different color greens gives the green more variance.)


 Once I had the whole section painted with a thin coat of the green, I added just a touch of the opaque white and swirled it slightly in.


I then added a little bit to the painted green, mixing it around til I got the look I wanted.
(For the white section next to the greens, I did the same technique, only I used a base coat of white opaque mixed with the liquid fill and added small swirls of green).


When the spaces are filled, you may find, as I did that there will be places that the outline was not consistently piped on.


This can be remedied by going back and piping the black onto those places where the colored paint is leaking onto the black. 
(This can be done while the colored paint is still wet, or after it is dried.  If you feel confident, correct while still wet.  If you are worried about slipping, wait until it is dried.).


 After the paint has dried (and please, don't be hasty; the paint is very runny when it is wet!), holding the piece up to a window will reveal places that were not adequately painted.  These can be filled in with paint and allowed to dry to make the piece look complete.


(Be careful about putting too many layers of paint onto the glass.  I recommend painting it once or twice with two thin coats allowed to dry thoroughly in between coats
and then adding touch up color to spots as needed.  Too many layers of paint will make it lose the "glass" look by making it too thick and lumpy.)


My "stained glass" piece fills the window the way I was hoping and cost about $30 to make.

I used 14 bottles of paint, some of which I purchased in a set with a coupon and the extras while they were on sale for 40% off.  The extra paint left-over has created numerous other projects as well.
These are the colors I used:
  • red
  •  yellow
  •  pink
  •  orange
  •  2 blues (one opaque, one liquid fill)
  •  white
  •  3 greens (2 liquid fills, 1 opaque)
  •  purple
  •  clear liquid fill
  •  and black with silver painted on top.


Happy crafting!


Friday, March 15, 2013

Painted Stained Glass


Do you have an old frame you aren't using?


Here is a simple fun project anybody can do:

You'll need some glass paints: I used Martha Stewarts Gloss Opaque Glass Paint
and her Liquid Fill paint.


After removing the picture,
I picked out an image I wanted to use from the Graphic Fairy


and printed it to the size I needed for this frame.*


After I taped it to the back of the glass,
I used some black opaque paint
and squirted it onto the glass along the lines of the flower I wanted to highlight
also creating some outward lines to give it a pieced glass look.
I let this dry well for about 2 days.


I used some of the paints straight and others I mixed the colors to give more variety.
I mixed liquid fill with them to thin them some.


 Here is the piece all painted in and set aside to dry.


When it dried, the painted edges cracked some.
I didn't mind on this piece as it was just an experimental piece.
For my next larger piece I used the paints specifically called "liquid fill" paints to prevent this from happening.
(I'll show you that piece as well...soon)


It makes for a nice bit of color in the bathroom window.


A fun use of an old frame and there is plenty of paint left for other projects.


*This is how I use transfer images for me to use:
1. Open up Microsoft Word on your computer.
2. Click on the image you want to transfer, and it should pop up in a new window.
3. Right click on the image, and click "Copy Image"
4. Click back onto the open Microsoft Word window.
5. Right click again, and click on "Paste".
6. The image should now appear on your Microsoft Word page.  It can be shrunk to whatever size you want by clicking on it, and then place your mouse in one of the corners, click, and drag the image to the size you want.
7.  Place the image on the page where you want it, and print it up.


Linking up to: