Sunday, December 20, 2015

Christmas Coloring Picture

 My teenaged daughter has discovered the coloring books that have become popular for teens (and adults) right now.

I have to admit, I've been tempted to rip out a few pages from her books and lose myself in them with colored pencils or markers.  She guards her books too well though, so none have been nabbed yet.  She has done some beautiful pictures, carefully tearing them out before she starts them and, when completed, neatly filing them in her treasured notebook.

I thought it might be fun to make a coloring "Christmas card" for friends that is actually a bookmark rather than a card.  Something inside me hates the thought of a Christmas card getting thrown out, so I'm hoping a bookmark will be more practical and may have a longer lifespan.  (Is it strange or does anybody else relate to feel a perplexing dilemma when it comes to Christmas cards?  I can't keep them all forever, but throwing them away seems so sad.  I loved looking through and cutting up my mother's old Christmas cards she kept rubber-banded in old shoe boxes...they seemed to hold a bit of the glitter of cheer from years gone by...)


Anyhow, I thought I'd share the bookmark here in case anybody else might enjoy coloring it.


 Here is the colored version I did using Copic markers.


 If you have paper-wasting issues like I do,
or "Christmas-can't-be-lost-to-trash-cans" dilemmas,
or if you just feel the love of coloring calling to you from days gone by,
this may be a happy choice for you.
Here is an image you may print up with four bookmarks on it.

As are all the printables I share on my blog, these are free for personal use, just not for resale.
You are welcome to use them in Sunday school classes or such as well.


I hope you have a Merry Christmas!


Friday, October 9, 2015

The Painted School Rug

We moved this summer...
the cows, the chickens, the ducks, the dog and cats, the bearded dragon,
and the people.

Of course, with moving comes new rooms with new needs.

The school room has beautiful new wood flooring
and my kids are students of various ages and mess-making ranges,
and I knew paints and play dough was still in our future.
The price of large rugs was a bit too much for my budgeting,
besides the fact that rug isn't always the best choice for paint or play dough either,
so I read up about painted cloth rugs and decided it was worth a try.


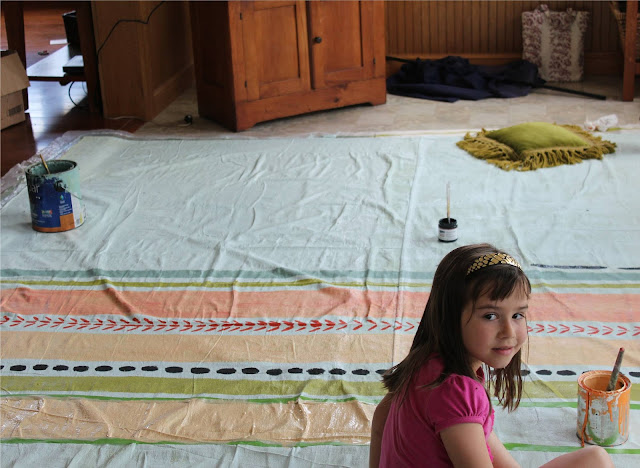
I bought a  9 x 12 Heavy Duty Canvas Drop Cloth  at the hardware store for about $27.
I laid it out on the living room floor since there was enough room there to work.
I put plastic liners underneath (I think I had an old shower liner, cheap party table cloth, whatever I could find to fit the purpose).

(Tip: if I were to do this again, I would iron it and sew the edging under to give it a finished look before laying it out to paint it.  I made the mistake of thinking the wetness of the paint would draw out the wrinkles, but it did not completely; I also thought I would be able to do the edging after the rug was complete, but also not an easy task once the layers of paint have added their bulk).

I then painted a base coat of flat interior wall paint: whatever I had left from the old house.  (This is a great way to get rid of old paint you don't want to store any more.)
The color was a dull greenish gray by the time I had mixed all the left-over colors together.
I think it would have been even thicker if I had done another coat,
 but I used up all the paint I had and didn't feel like buying more, 
so, once the base coat was dry,
I moved on to painting a coat of off white semi-gloss interior wall paint as the base color of the rug
(I don't think it matters whether it is semi-gloss: it is just what I had already).
The off white paint was allowed to dry.


The fun part of painting the colors on the rug came next.

I looked at rugs I liked on blogs, pinterest, magazines, and finally decided on a variety of stripes and designs.

I was in a hurry to get the rug done, so I just painted the stripes on without any guides,
also using house paints that I wanted to use up.
When my daughter kept telling me she really wanted to help,
I pulled out the frog tape and laid out a few guides so she could paint some stripes. 
This was a school rug so perfection was lower on the grade than creativity.


She did a great job, it helped speed the process up with both of us at work,
and we both feel good about the rug we made.


Once the rug was colorful from end to end and dried completely,
we dragged it out on the porch since it was a sunny day
(we brought the protective plastic for the edges).

I then painted water-based polyurethane in a nice thick coat over the rug.

It dried quickly and I was able to put another coat on a little later that day
(I used about 2 1/2 quarts of polyurethane).


 It fit perfectly in our new school room.


The rug has already gone through a spill of paint, some squished in play dough,
and a birthday party mishap of spilled nail polish.

Amazingly enough, I have been able to mop the rug as I do the rest of the floor,
and the paint came up, the play dough has been removed,
and the nail polish blends pretty well with some of the stripes.


For less than $100, we have a rug that works well for us in our busy room.


 Thanks for stopping by.
I really do hope to be around a bit more now that the past 6 months of packing, cleaning, clearing, sorting, and settling in have finally passed and I feel like I can breathe again.

I am so ready to have some art time back in my life!

What have you been up to lately?


Saturday, April 4, 2015

Sketching Several Photos into One Piece of Art: the Farmer and the Horse.


  My house has been busy with several projects lately, and I thought I'd stop by to share one of them today.

   I was asked to do a piece for a lady that would be done in pencil.  Her husband has told their children stories about a farmer and his work horse and she wanted for me to create an image to remind them of those story times with him.  She wanted the man to be indistinguishable, as we all know how we form pictures in our heads when we hear stories, and she wanted each child to be able to keep their own ideas of what he looks like.

We looked up some images on Pinterest to try to get a working idea together, and I began to use these as basics of what to work toward.  (I will suggest if you like horses, type in 'work horse' or 'draft horse' on Pinterest...there are AMAZING pictures of them!)  I found several photos ideas for the farmer and the horse.

  I started by measuring out and drawing a box in the size that was wanted for the image to be.  This gave me guidelines of how large to make the sketches.


I spent a considerable amount of time sketching the images onto tracing paper.
(There were more eraser crumbs on that page than is probably legitimate for one piece of artwork!)
Often, I would stop and take a picture and then walk away, come back, and look at the picture in the camera.  Something about doing that makes me get a clearer perspective on it.
I could see in the image above that my horse's nose was off from what a work horse's nose should be.


In this sketch, I could see the horse's eye not right, and the man was a bit disproportionate as well.


I finally got a sketch I thought I could work with,
rubbed charchoal on the back lightly,
and then traced over the front drawing lines so the image would go onto my good paper.


I then began first with the eye of the horse.

When that was where and how I wanted it, I added some detail around it.


I did not mind that my horse was not exact. I wanted to take some artistic license as to the coloring and the angle that the horse would be approaching the farmer because I was using a few different photos to create the image I was trying to achieve.  The photos were just used as guides.


Here is a picture that shows you the light sketch that was transferred of the whole image.


I continued adding more details to the horse.


At this point, I realized I did not like what I was seeing in the nostril/chin/lower muzzle shape of the piece, so I set it aside to pick up for another day.

I will do the same now and will show the pictures/progress of that part in my next post.


Thank you for stopping by!


Saturday, February 14, 2015

A Valentine Love Renewed: Recycled Crafting.


HAPPY VALENTINES DAY!


I wanted to share one more valentine decoration before the day passes by.


Frames seem to be a weakness of mine.
When I see them at yard sales or second hand stores,
if they are unique and sturdy,
 I tend to want to pick them up for future projects.


 This frame held a unique piece of artwork: a paper crafted quilt (maybe paperclay?)

It was dated.
 It reminded me of when my sister loved making quilts back when we were teenagers in the 80's.
It was hard to think about just throwing it away,
so I thought I'd try to revive it for Valentines Day.


Using markers, I started carefully changing the quilt colors.
(Wouldn't it be nice if we could do this so easily with real quilts when they fade or our color scheme changes?)


I also painted the mat and background bright colors to go with our living room.


The finished quilt in a frame was set on one of the living room tables.


This addition was a lot less work than creating a new piece of artwork;

and it is kind sweet to think that somebody else's lovingly created piece
is given a second time around to be loved.


Thanks for stopping by!


Monday, February 2, 2015

Valentine's Day Decorating: True Love.


For some reason, Christmas seemed to go too quickly this year,
and the thought of taking the Christmas things off the mantel was disheartening.

I was ready for my everyday things I had in the summer.

So I thought we'd make the winter a bit more fun with some Valentine's Day decorations.


 I noticed that my kids seem to learn verses better when they see them around the house,
so I thought I would create something from some wonderful verses I wanted them to know in 
I Corinthians 13.


To create the verse hearts, I started by folding a paper in half
and drawing half a heart shape on it,
pushing the pencil hard so that the pressure of the line would go through.


I then outlined the lines of the heart to complete it.


Depending on the verse I was going to work on,
I used fatter hearts for ones that needed more wording in the middle of the verse,
or thinner hearts for verses that were shorter and could be broken up more.


I lightly drew some lines with a ruler to help keep me somewhat straight while lettering,
and began trying to place the wording in,
(this took several tries, not such an easy task)
 using letters at the beginning and end of words to make curls and swirls
to form the outside edges of the heart.

When I had the verse the way I liked,
I rubbed charcoal pencil on the back of the verse page,
laid it onto a larger sheet of good art paper,
traced the letters so that they would copy onto the good paper,
and then worked the lettering with red copic markers.


 The largest one, I did on a canvas with paints because it had a lot of wording in it,
and I knew it would be impossible for me to try to fit them all on smaller paper.

When finished, I took pictures of each so I could shrink them to whatever size I needed
and then printed them onto cardstock paper.


I had picked up frames from yard sales, the charity store, and an aunt who was getting rid of some,
so I used gold rub-on gilding paint from a tube to turn the two that were different colored into gold
and to touch up a few chipped spots on the others.
(I also rubbed it onto the decorative hearts also on the mantel).


 The other pieces on the mantel were all things we found at the second hand charity store for a very small price.
(I was actually going to paint the birds like peacocks since I have a thing for them right now,
but  my daughter liked them as they are.

It's nice to have the daughter's impute...sometimes. :) )


I have one more simple project I did to decorate the living room for Valentine's Day,
so I'll try to post that in a few days.


Thanks for stopping by!


(If you would like to use these verse prints below for yourself for decorating or cards,
I am happy for you to copy and print them;
just not for resale, please.)