Friday, August 30, 2013

Using Art for a Clean House: Chore Chart


Today I am going to switch my usual vintage illustration post with a home project
because I wanted to join in Kelly's Korner blog and share a post on "cleaning tips."


Trying to keep the house clean with three little kids on a farm can often seem overwhelming.  I quickly realized that a great way to try to keep up with the house
is to encourage a bit of help from the little folks themselves.


Last year, I created some images to use to make chores more fun for the kids
and easier for those who aren't reading yet to see what everyone is supposed to do.

I affixed the images to used canning jar lids and put magnets on the back.
We used an old tray to put them all on.
At the end of the day, the kids got "tickets", little colored papers, that they could save up to use in the 'Attic Store.'  The 'Attic Store' is a space we cleared out in the attic and have some odds and ends I have picked up on sale, at the second hand store, and at yard sales: games, art supplies, hair things, little toys, videos, etc.  Each item had been priced 25 - 100 tickets or so, depending on the child who they were intended for and how many jobs they were expected to do (otherwise, my youngest would take a year to be able to purchase her items).  On occasion, we would change the target goal to a breakfast out with dad or some other fun adventure.

Before Christmas, I can change the tickets to money rewards so they can save up for some Christmas shopping.

Here are the images I made for their jobs
(yes, there are some that are not really "jobs", like reading some of the Bible everyday,
but it is a good habit that will help them through life, so I made it as well.  Certain of their jobs are much harder than others, but I figured the easy job tickets make up for the harder ones,
and they knew that they had to do certain jobs in order to get any tickets each day,
like making their beds: that had to be done or no tickets would be rewarded.)


The kindness award was given when I saw somebody doing something that I thought was especially kind.


 I need to made a few more to add to this list: my daughter occasionally helps with hanging/taking in laundry, helping with lunch, and I want to add watering the house plants to somebody's job list.

Here are some colorized versions I made using Copic markers,
 but kids could color their own in as well.


 Some of the jobs are seasonal, like the hauling wood happens more in the fall and winter.
Helping with plants happens mostly in the spring.


Vacuuming and the stairs are done on Saturday morning, and only one room is necessary at this point.

If they want extra tickets, they can do additional work at their choosing,
and mom is always happy to give them extra tickets!


This year I changed up the structure of our chore chart. 


I shrunk the images down when I copied and pasted them into Word
and copied, pasted, and cropped a few extras of the jobs I needed for more than one child.

I cut them and then put them into contact paper.
I got some velcro tape at the dollar store and put one section of that on the backs of each chore.

For the chore chart board, I painted the middle section of an old cupboard door using Annie Sloan's Chalk Paint in Ambusson blue,
 which can be used like a chalkboard. 


I painted the edges in a cheerful yellow.
Color is always fun on a chore chart.


 I put the other part of the velcro tape down the front side of the painted board,
and will put each child's name on the left side of the tape.

On the right side, I will use chalk board pens
to create a graph for the days of the week so that those lines won't have to be written in every week
but they can be washed off when I need to alter something.
(These look like chalk marks but stay on well unless washed with water).

The chart is leaning up against the wall in the living room that is painted in chalkboard paint
so it will be easy for them to mark an "x" on the chart when they complete their jobs.


 I put another strip along the bottom to hold the extra chores.


It is always fun to have a new chore chart at the beginning of a new year.

I found this system to be very effective, jobs getting done everyday without my even having to ask.
It's amazing what just walking by a straightened boot box will do to a room...
especially when I don't have to ask anybody to do it.

But even better is the sense of responsibility and help the kids get from being a part of keeping the house running smoothlly.


You are free to use the chore pictures I have made if you'd like,
as long as they are not for resale.


If you would like me to create certain chore pictures for you,
just leave a comment and I will post those here as I finish them.

Have a great weekend and thanks for stopping by!


Linking up to:

Wednesday, August 28, 2013

Art Lesson: Writing Neatly on Artwork.


Hello.


Today I am going to be picking up my pencil
and giving a tip on how I go about creating wording in artwork.


I took some pictures of two enjoyable elements in my life:
canning jars and flowers.   I thought this would be a fun picture to attempt for a fair exhibit.

I want to experiment with some watercolor paints since it has been quite a while since I have used them, so I thought the blue glass would be bright and bold.


I decided to narrow the focus of the picture, but I always seem to have trouble with wording.
Writing neatly, especially on artwork seems to be a frustration for me.

I start the sketch on tracing paper to work out the details.
I knew I would be making many mistakes and a lot of erasing.


One trick that really helps me is to get the shape/position of the lettering drawn in first,
usually in the shape of a rectangle.


I then sketch in the first letter, and usually the middle letter and last.
This isn't always the exact middle letter.  It depends on the size of the letters.  "I's"  take up much less space than "M's" or "W's".

Because of the angle of the jar in this picture, I started with the first letter and the last letter that looked full-sized.


I then worked and reworked the lettering until I got the letters to look as they did in the photo.


The borders of the rectangle help me to keep to the letter size, spacing, and angle I need them to go.

Have you tried doing lettering on artwork?
Do you have any tips to share?  I'd love to hear.

I will work some more on this picture and show you how it turns out soon.

Thanks for stopping by and take some time to enjoy the roses...
it's always worth it!


Monday, August 26, 2013

Free Coloring Pages: The Ten Commandments 1


For the past few months I have been working on some coloring pages for kids.

My daughter had to learn the Ten Commandments last year in school,
and she seems to have an easier time of it if she has a coloring page.

When done, I can put ring holes through them or just staple them together and she can use her colored pages to go over her memory work.

I hope to provide these in the future as I get them done.

Some weeks I will post these instead of a home-craft on the weekend.

This one is coming here late because of internet problems, yet again.


You are free to use these for personal or church use, except for resale.
I made a colorized version as well.

I will work on putting them in Dropbox or somewhere where printing them up will be easier,
when I can figure that out.

Until then, if you click on the image, right click,
and then click on "copy",
open up Microsoft Word and right click on the screen,
and then click "paste",
it should paste the image onto the page.

If you have difficulties or suggestions,
please let me know.


I hope these will be helpful.


Thanks for stopping in and I'll be back for an art lesson in the middle of the week.

Have a sunny day!


Linking up to:


Saturday, August 24, 2013

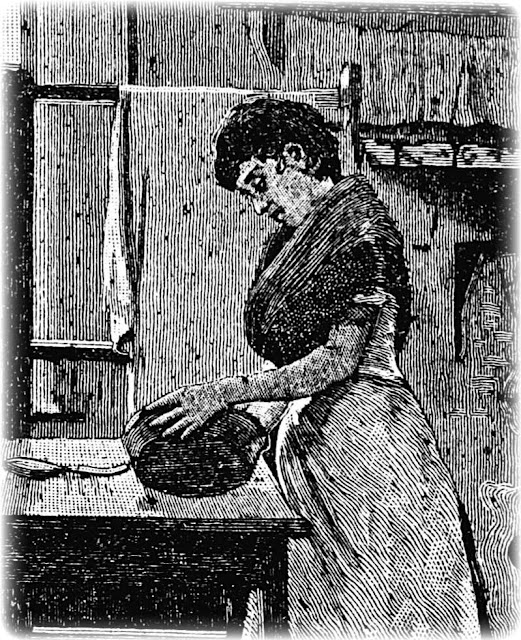
Vintage Image: Woman Working in the Kitchen.


A woman's work is never done.

I've been canning up til all hours of the night the past week:
peaches, tomato juice, blackberry syrup, and now I need to start on the green beans.

I thought it would be fun to share this vintage image, since I am sure she had it MUCH harder than I, with my running water, hot water heater, and stove.

The cat watching her work is something we do share in common.


Here she is in a cleaned up image, black and white.


Here is the image cleaned up and antiqued.


I cropped the image to have just her at work.
It must be chilly in her kitchen because that shawl around her neck looks like it is warm.


Antiqued.


One last image of her a little bit closer.


And I couldn't resist doing an image of just the kitty.


He looks like a sweet companion.


That's it for today.
(Be sure to use any of these images as you wish.)

Have you been busy in your kitchen this season as well?

I think I will head out in the gardens since it is so nice out today.


Thanks for stopping by and have a beautiful weekend!

Linking up to these blog parties:
 Themodestmomblog.com
 Wearethatfamily.com
Raisinghomemakers.com
Savvysouthernstyle.net
Proverbs14verse1.blogspot.com: Wise-woman-linkup
Hiphomeschoolmoms.com
Aboverubies.net
 Time-warp-wife.blogspot.com
 Betweennapsontheporch
Cozylittlehouse.com
Uncommondesignsonline.com
Homestoriesatoz.com
Commonground-do.com


Wednesday, August 21, 2013

Art Lesson: How to Paint a Wall Mural


Hello.
I am back today to talk about murals.


Wall murals can seem daunting because of their size,
but really, depending on the detail you want and the size of the space you are painting,
if you break the mural down into bits, it's not such a hard thing.


Here is what I do when I am planning a mural.

First: deciding on the mural you want to paint.

I have a confession.
I am a magazine mutilator.
Yes, I know, it does seem harsh to tear up beautiful magazines.


I have collected an assortment of pictures of images that I like over the past 20 years.

I have different categories of images I keep: favorite artists,
painted landscapes, painted birds, snowmen, rooms I like, farm scenes, farm animals, flowers, still life, borders and designs, fruit, painting tips, folk art, Christmas ornaments, Christmas decorating, 
and several other categories,
one of them being mural ideas.

  Keeping images for years can definitely become a pack-rat issue, so I try to only keep images that shout out to me and make me swoon.


Some images I keep because I like the style in which the buildings were painted;
or I like the way the trees were painted.


Like the wall mural in the picture above, I loved the fern style and put some of them on my wall mural.


Sometimes, I like the way the land is painted, the landscape and the layers of fields.


Adding fields of trees doesn't have to be extensively detailed and time-consuming it they are in a big mural where precision and care is spent on the scenes that are supposed to be more dominant.


It is great to start an image notebook to keep ideas that sing to your heart
or that you think you may find a useful help to you.


Once you have the general idea of what you want for your mural,
pick a basic wall color to work with.
At first on my mural, I painted the walls with a light blue,
but I did not like the way this looked for this space,
so I went with a banana cream color.
This color worked for the look I wanted, even as the "sky."


I remember when I decided to paint my wall mural,
I had a subscription to a painting magazine (I think it was PaintWorks) and there was a tutorial on how to paint a water mill.  I knew I wanted it on the wall.


It would be one of the main "art" portions, with more detailing spent on it.
I then had to decide where I wanted it.

When trying to visualize how you are going to paint your wall mural,
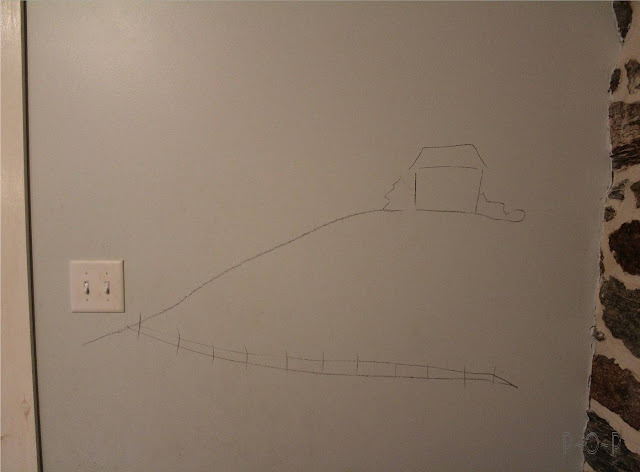
it is a good idea to grab something that washes off easily, like a charcoal pencil or some chalk board chalk (if your wall is white, sometimes the charcoal can slightly stain it, so I would suggest instead to use a piece of lightly colored chalk board chalk.)


Roughly sketch where you want to place your main objects on the wall.


When you know the type of landscaping or if you will add any other buildings or trees to your scene,
sketch them in.


If you don't like what you see, simply erase with a damp rag or paper towel.


Adding height to a mural, by placing a tree in the scene, makes the mural appear to have more dimension,

 as if the house is far away and the tree is closer.


Experimenting with this idea is great fun.


I remember when I was planning my mural, at first, I drew in taller trees,
and more of them.


I decided it was too busy, and cut them down in size and limited it to one tree at the top,
and one a little further down
and then a couple of trees that appear to be in the middle section of the landscape.


I put a fuller tree on the right side wall,
as well as some taller mountains.


This seemed to look better to me than making the trees exactly the same height on both sides,
giving it some diversity.


Working out your mural's background is completely up to your taste.

If you don't like the way a line is going,
simply wipe it off and try a new line.


The fun thing about murals is that they are a collection of pieces of artwork that you mend together.

Once I have my sketch the way I like, I can begin adding color to it.
I put washes of color, watered down colors that are light but not so wet that they drip.
Once the washes dry, you can be as detailed as you want.


or as simplistic.


To divide sections of land, which are just washes of different colors,
I would put a row of trees blocked in with very little detail.


This occasional tree or tree line helped me feel like there was more variety to the divisions of the fields.


If a person feels uncomfortable painting the detailed images of  mural,
 one could always use the transfer method to help.


For example, if my daughter wanted a castle scene on her wall and I was not having success with a castle, I could always enlarge and print up this one that I love from the Graphics Fairy.


(I explain how to transfer and enlarge images onto Word Press if you click on <THIS POST>)


After coloring the chalk or charcoal pencil on the back and it is taped to the wall,

the parts of the image wanted on the wall are traced.


A desired landscape can be added.


A larger image can be used to give dimension.

My daughter would choose this one:


(Yes, I know he looks a bit out of shape.  Looks as if the Princess needs to work him more).


My son was watching me coloring on the wall with a bit of consternation,
but then he wanted a mural for him.


Anything is possible with a wall as a canvas.

And the great part of it is,
if you don't like what you have done, or if you someday want a change,
a coat of paint or two will wash it all away.


I hope this helps give you some ideas if you've been think about a wall mural.