Wednesday, April 17, 2013

Seeing the "Lines" that Make Art Come to Life.


There are lines all around us.

It is pretty amazing that just a few lines scratched onto paper can seem to tell a story.

What do you see in these simple stick figures:


Vertical lines (up and down) often give the feel of stability, strength, grandeur
like a forest of tall trees, skyscrapers, or a soldier standing at attention.


Horizontal lines give the feel of peacefulness and calm
like a sunset or a lake or a bed.

Diagonal lines can give the feel of movement, action, liveliness.

(Of course, this isn't always the case, but it seems to often be this way).


Here is some live examples of diagonal lines showing action.


I decided to sketch this one.


I find that starting with a stick figure can be helpful in getting the lines right.


Once I got the lines the way I wanted, I started adding form to the body as well as the clothing.


I then etched in some of the features of the face, noticing that only one eye is visible...


and even that is just a simple line of lashes.


The nose is two little dots at the end of a curved line
and the lips are a smudged line with a slight cheek curve at the edge.


Her dress has obvious shaded areas,
like a triangular shaped area that covers nearly the whole front of her dress.
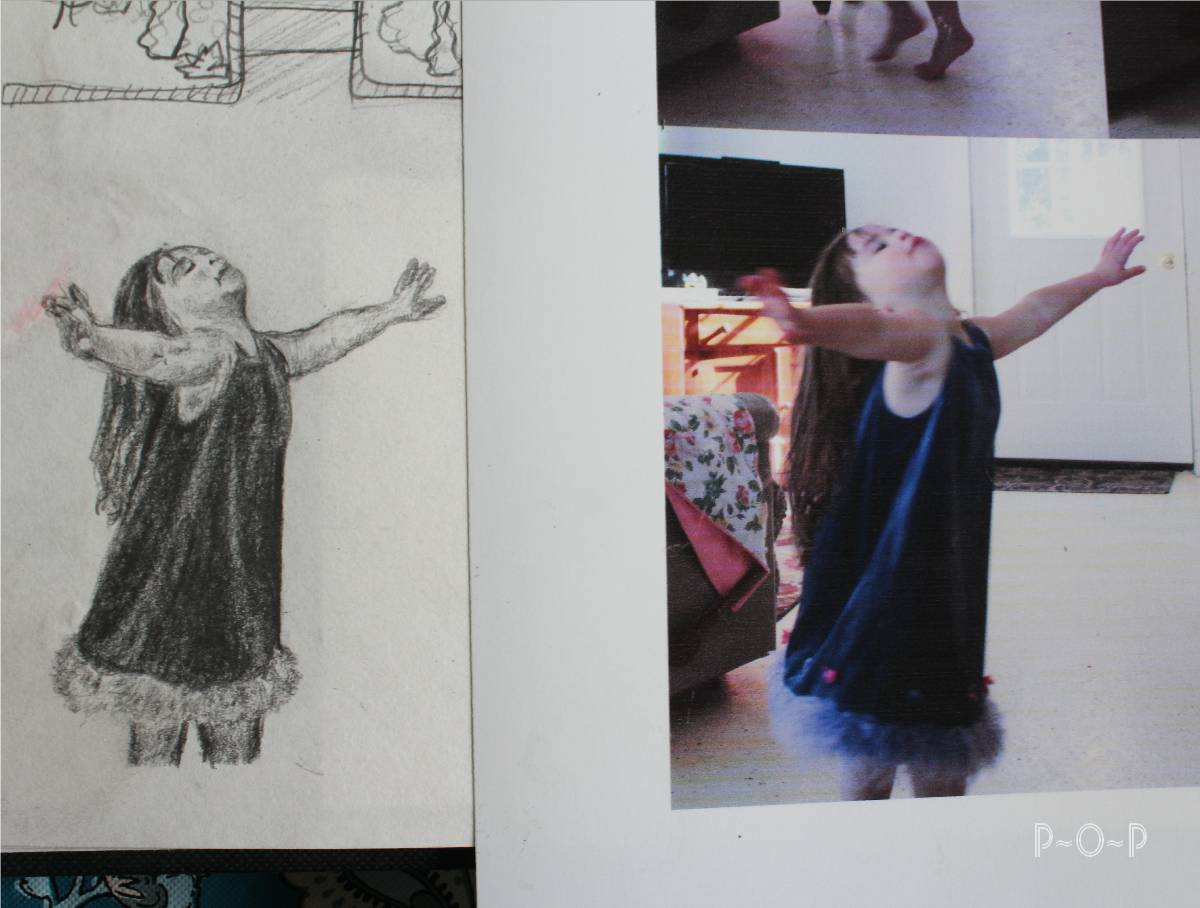


Squinting and lightly rubbing my pencil on the areas of the skin that looked shaded helped to finish the sketch.


See if you notice the lines of things around you and if they give you certain feelings.
Then take up a pencil and draw something that catches your eye.

Thanks for stopping by!


This is part of my free art lesson series each week.
To see the full list of art lessons, click <HERE<.

(I now have a facebook page.  If you would like to share your own artwork you are working on, I would love to see it.  Please, just remember that my blog is also for children who want to use the art lessons (and I would LOVE if you want to help them share theirs as well), so please share artwork that is family friendly content.  Thanks so much.)


Sharing this post at:
Nominimalisthere.blogspot.com 
Adiamondinthestuff.com
Aboverubies.net
Time-warp-wife
Abowlfulloflemons
Newlifeonahomestead: Homestead-barn-hop 
Betweennapsontheporch
 Embracingchange.com
Theshabbycreekcottage.com 
Raisinghomemakers.com 
 Firefliesandjellybeans.com
Savvysouthernstyle 
Gnowfglins.com 
Bystephanielynn: Sunday-showcase-party


Saturday, April 13, 2013

Embroidery Hoop Mobile


Here is a fun craft to do, especially for a girl's room or a school room
(although the same concept could be used for eagles, seagulls, airplanes, etc., and used for a boy).


My daughter painted the black and white ones with watercolors and cut them out one day for her at-home art class.


 Afterward we painted the embroidery hoops (which we picked up for a good price at a second hand store) with purple.
I lined them up and drilled a hole through the base of them, lining up all three of them to make sure the holes were even.  I did the same for the top as well for two of them; the screw tightener was at the top of the other.


 I then drilled the number of holes I wanted to hang butterflies from in the bottoms of the hoops...


and some in the tops of the hoops.


 We then used some purple wire along with some beads from a friend and randomly placed them along the wire, wrapping the wire back through each bottom bead to hold them in place.
We strung butterflies randomly on the wires (a hole had been poked through each with a sewing needle).


In some places on the hoops, we put a butterfly on top of the hoop with some beads strung out from the bottom.


 We finished the mobile off with some of my daughters favorite colored ribbons
and a few glittered butterfly ornaments left-over from Christmas.

 (The paper towel roll flower in the middle was the project I shared last weekend).


This was a fun project to work on together and now floats from a sunny spot in her room. 


Thank you for stopping by.


Sharing at:

Friday, April 12, 2013

Girl in the Garden Free Vintage Image.


The warmth of spring has finally come to my area,
so I have been out in the flower beds digging and moving plants around.

I thought I would share some vintage images I found that spoke of the fun of gardening.

Here is the original of an old book illustration from the late 1800's.


 I cleaned it up and made an antigued image as well as a black and white.


I found the following illustration at the top of a chapter and cleaned it up as well.


Feel free to use these illustrations as you would like.

They are not copyrighted, as far as I know.

Have a fabulous weekend.
  I hope to find myself spending more hours out in my gardens.

Wednesday, April 10, 2013

Sketch Book


This week's lesson is about having a sketch book,
a place to practice and journal your art endeavors.


Do you have a sketch book?

 (They are also called 'art journals'.)


A sketch book is a great tool for every artist.


For this blog, I purchased a sketch book.


It is a handy place to keep my thoughts all together.


 An art journal is helpful for drawing the things you see around:
a person, place, or just something you want to capture on paper.


It is a great place to practice drawing because it is just for fun,


just to practice.


When something doesn't turn out as expected...


 it can be a stepping stone for next time.


Instead of using pencil, one might chose to use a light color of the image
to sketch out the basic shape.


New attempts can be made,


sometimes right away,
sometimes a little while later.


Instead of drawing what one thinks should be there,


one must train the eye to pick out what is really there...


and draw what one sees.


If you can, get a sketch book to capture your practice,
adding dates and some words.

If you have a picture of something you were attempting to draw,
glue that to a page, if you'd like.


It is your book to use as you please:
your tool to be shaped to your hand.

Someday you'll be able to look back and see,
not only some great memories,
but terrific improvement as well.


 And it is an enjoyable way to get a few minutes of art into some spare moments you may find.


If you have a sketch book, do you have a favorite page?
If you don't have one, please try to make room in your plans for one very soon in your future.
 You'll be glad you did.


This is part of my free art lesson series each week.
To see the full list of art lessons, click <HERE<.

Sharing at:
Funkyjunkinteriors.net
Lifeingrace
Newlifeonahomestead: Homestead-barn-hop  
Betweennapsontheporch 
Iheartnaptime

Sunday, April 7, 2013

Paper Towel Cardboard Roll Flowers...A Big Name for a Simple Project.


Today I am going to show you a fun craft you can make using
some things you may find in the trash can
(but try to get them before they actually get in there).


You will need 
1. 1 cardboard middle from paper towel roll (or 2 cardboard rolls from toilet paper) for each flower (I made a two-sided flower, so I needed twice these supplies.)
2. a piece of cardboard (a cereal box was my source)
3. a ruler
4. a colored marker (a light one is best as it won't bleed through the paint)
5. paint colors of choice
6. some plaster of Paris to mix in the paint
7. and a cup or rinse water with paintbrushes

1. First, taking your ruler, your light colored marker, and your cardboard roll from your paper towels and  mark off 1 inch of an inch at one end.  Mark another line 1/2 inch from your first line.  Then mark about 1 1/2 inch on the last section and cut the extra off. 


2. Using the left-over piece from the cardboard roll of paper towel, mark off 3/4 inch first (this will be the inside sepals of your flower.  Then mark 3/4 inch for the next line (to create the middle section), and then 2 1/2 inches from that line.  Cut on this line.


3. Taking your longer piece cut small slices to the line.
This will be the sepals in the flower, so cut them as you want them to look.


4. Next cut the other end to the line.  This will be your back row of petals.  There will be 3 rows of petals in all.
Cut them rounded or however you'd like them to look.
I ended up rounding the edges of these a little later on.


5. Cut the smaller paper towel edges to the lines, realizing that the smaller end will be the first row of petals,
and the other side will be the second row of petals.


They should look something like this.


6.  Finally, take the shorter paper towel cardboard roll and carefully slip in onto the longer cardboard roll.  You may have to squish the inner one slightly and then adapt it once you get it in place.


7. Spread the petals out.


(You can turn the inner row inward to look more like sepals.)


(I then repeated this process so that I would have two of these flowers because I was using this as a centerpiece in a mobile.)


8. To finish the flower off, I placed it on a piece of cardboard from a cereal box, and cut some rounded petals for a back piece that made it look like a fuller flower while giving it stability. 


 This is what I had (I was experimenting with different flower petal shapes and sizes; that is why they look different, but I knew it wouldn't be noticeable on a mobile).
 (The flower on the left was made using 2 toilet paper rolls: that is why the sepals look slightly scrunched; the one on the right I used a toilet paper roll for the inside and a paper towel roll for the outside, but this made the two pieces very loose and had to be glued together.  You may use whichever you think would work better for you).


I then glued the flowers to either side of the cereal box flower shape, and painted the whole thing, mixing some plaster of Paris into the paint to give it a thicker consistency. (Painting without the Plaster of Paris is an option if you don't want that look).  For a glossy finished look, a spray of sealer when it is dried does the job.

(Here it is before it was hung in the mobile.)


I'll share the details of how the mobile was made...

...and the fun painted butterflies my daughter created using images from the Graphic Fairy
in >THIS POST<.


Sharing at:
Savvysouthernstyle.net
Graphicsfairy
Betweennapsontheporch
Funkyjunkinteriors.net Wise-woman-linkup
Iheartnaptime